Exterior Paint Maintenance Checklist
Exterior Paint Maintenance Checklist
Exterior paint is more than just decorative - it protects your home from moisture, UV rays, and weather damage. Neglecting maintenance can lead to peeling, cracking, or water intrusion, which causes rot, mold, and costly repairs. Here's how to keep your exterior paint in good shape year-round:
- Annual Inspections: Walk around your home every spring or fall to check for peeling paint, cracks, or moisture damage. Use tools like a flashlight, ladder, and binoculars for hard-to-see areas.
- Seasonal Maintenance:
- Spring/Summer: Wash surfaces with mild detergent, refresh caulk, and touch up peeling paint.
- Fall: Repair UV damage, recaulk gaps, and clean gutters to prepare for winter.
- Winter: Monitor for ice dams, bubbling paint, or moisture buildup.
- Cleaning and Repairs: Clean painted surfaces yearly using low-pressure water and mild soap. Address peeling paint, wood rot, rust, and mildew promptly to prevent further damage.
- Recordkeeping: Track inspections, repairs, and materials to simplify future maintenance.
If you notice widespread peeling, persistent moisture issues, or structural damage, it’s best to call a professional for help. Regular care can extend your paint’s lifespan from 5 to 10 years or more, saving you money in the long run.
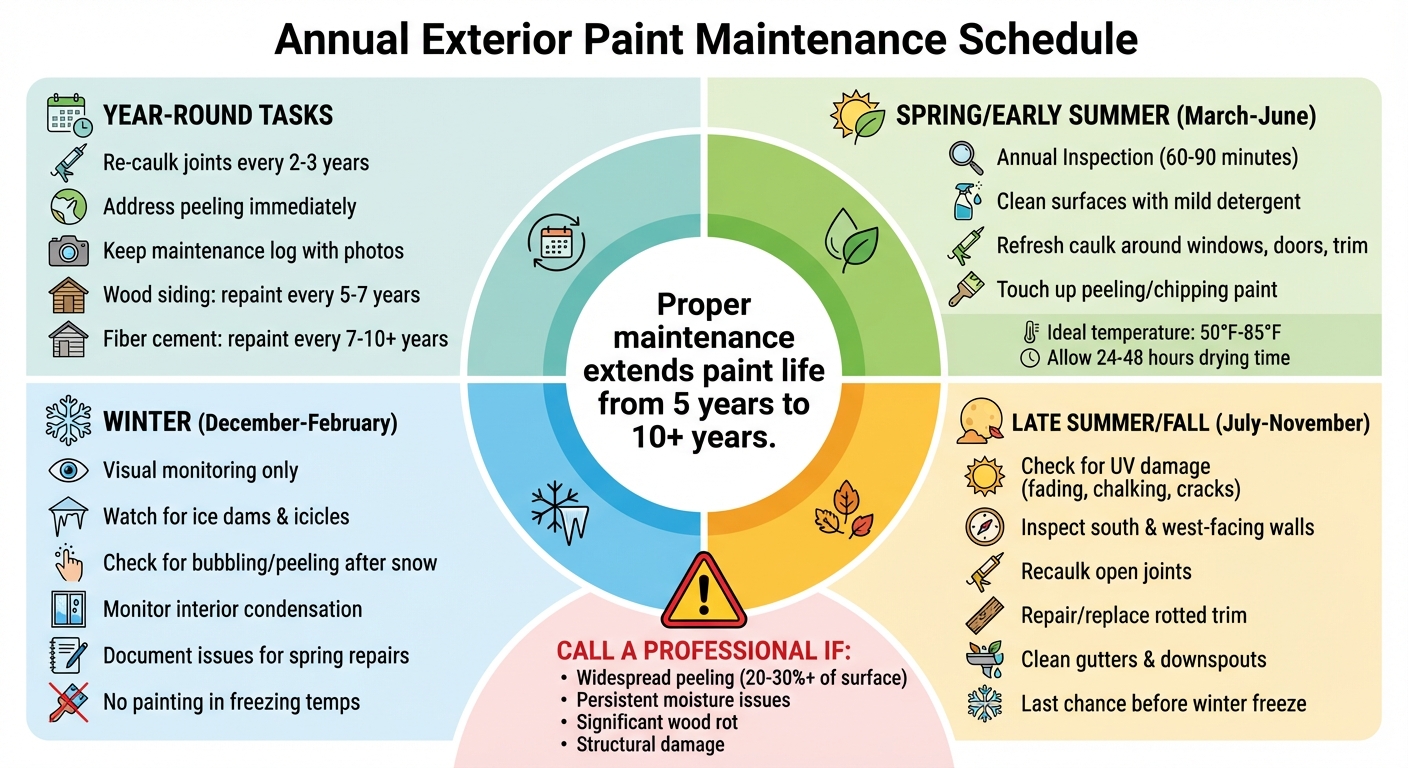
Annual Exterior Paint Maintenance Schedule by Season
How Often Should You Paint Your House Exterior? | Exterior Painting Maintenance Tips
Annual Exterior Paint Inspection
Taking the time for a yearly inspection of your home's exterior can save you from expensive repairs down the road. For most regions in the U.S., late spring or early fall is the ideal time for this task. During these seasons, surfaces are dry, daylight is plentiful, and temperatures are pleasant enough for a detailed walkthrough. Set aside about 60–90 minutes to examine siding, trim, doors, windows, and the foundation. Make sure to cover the entire perimeter of your property for a complete assessment.
Walking the Property Perimeter
When inspecting your home, follow a systematic approach to catch potential problems early. Start at your front door and walk clockwise around your home at ground level. Then, repeat the process while scanning higher areas. To make the inspection thorough and safe, bring along a 6–8 ft. step ladder for lower eaves, binoculars for upper stories, a flashlight for darker areas (like under decks), and your smartphone to snap date-stamped photos of any issues you find.
As you go, pay close attention to the condition of different materials:
- Wood siding, trim, and fascia: Look for peeling or blistering paint, exposed wood, deep cracks, or soft spots.
- Fiber cement (like James Hardie products): Check for hairline cracks, chalking, or failed caulking.
- Stucco: Watch for cracks, staining, or chalking.
- Metal elements: Look for rust, bubbling paint, or flaking.
- Windows, doors, and trim: Inspect for gaps in caulking, peeling paint, or discoloration near sills.
Focus on areas that are more exposed to weather, such as south- and west-facing sides of the house. Also, check roof-to-wall intersections, chimney flashings, gutters, window sills, deck connections, and siding near the foundation for signs of wear or damage.
Spotting Moisture and Damage Warning Signs
Not all paint issues are just cosmetic. Some may indicate water intrusion, which can lead to more serious problems. Be on the lookout for sagging or wrinkled paint, bubbling around trim or windows, and peeling that exposes the bare substrate underneath. To differentiate between superficial dirt and more serious concerns, try cleaning the area. If mildew or algae wipes away and doesn’t return, it’s likely a surface issue. But if dampness persists, or you notice soft wood, warped siding, or recurring paint failure, it’s time to take action.
Here are some red flags to watch for:
- Soft or spongy wood when gently probed with a screwdriver
- Persistent dampness or discoloration that doesn’t dry out after several sunny days
- Warped or swollen siding or trim boards
- Repeated paint problems in the same area
- Visible water stains on interior walls opposite the affected exterior
Once you’ve identified the problem, decide whether minor touch-ups or a full repaint is needed. Small, isolated issues can often be fixed with spot repairs. However, if more than 20–30% of an elevation shows peeling, chalking, uneven color, or significant cracking, it’s time to repaint the entire section.
For widespread issues, severe rot, mold, or areas that are difficult to access, it’s best to call in a professional. If you’re considering larger renovations, Bayshore Exteriors offers comprehensive solutions for siding, trim, and paint projects.
Seasonal Paint Care Checklist
Exterior paint faces challenges throughout the year. Winter's freezing cycles can crack it, spring rains test its durability, summer UV rays cause fading and chalking, and fall storms push moisture into unsealed areas. By breaking maintenance into seasonal tasks, you can handle the right repairs at the right time and potentially extend your paint's lifespan from 5 years to 8–10+ years, depending on your climate and exposure. This guide will help you stay on top of issues between your annual inspections.
Spring and Early Summer Tasks
As temperatures settle between 50°F and 85°F and rainfall decreases, it’s the perfect time to start maintenance. Begin by cleaning your exterior surfaces with a garden hose or low-pressure washer (keep the nozzle 12–24 inches away and angle it downward) using mild detergent. Let everything dry for 24–48 hours before moving on to repairs.
Next, inspect and refresh caulk around windows, doors, and trim where you notice cracks, gaps, or separation. Use paintable exterior caulk and allow it to cure before painting over it. For minor peeling or chipping, act quickly: scrape away loose paint, sand the area smooth, prime any bare spots, and apply a matching topcoat. These small touch-ups protect your home by sealing it against water intrusion. If you’re tackling larger siding or exterior projects, consider working with experts like Bayshore Exteriors to ensure everything stays sealed and secure.
Late Summer and Fall Tasks
As summer winds down, check for UV damage like fading, chalking, or hairline cracks - especially on south- and west-facing walls. Look for peeling or blistering paint near gutters, downspouts, and roof edges where water may have overflowed. Don’t forget to inspect for damaged caulk, exposed wood, or swollen trim that needs attention before winter sets in.
Fall is your last opportunity to seal trouble spots. Recaulk open joints, repair or replace rotted trim or siding, and address peeling paint by scraping, sanding, priming, and touching up problem areas - focus on fascia, window sills, door trim, and lower siding. Clean your gutters and downspouts to prevent winter runoff from soaking painted surfaces. Moderate fall temperatures (above freezing with low humidity) provide ideal conditions for caulk and paint to cure properly, reducing the risk of winter damage from freeze-thaw cycles and ice.
Winter Monitoring
During winter, focus on visual monitoring. Keep an eye out for icicles and ice dams along roof edges, as they can force water behind fascia and lead to peeling. Look for signs like staining, bubbling, or new peeling that might appear after snow or ice events. Also, check for snow or ice buildup against lower siding, as this can saturate painted surfaces.
Inside your home, watch for window condensation, moisture around sills, or cold, damp walls. These could indicate insulation or vapor issues that might later cause exterior blistering or peeling paint. Document your observations and plan repairs for the next mild-weather period in spring. In colder regions with extended freezing temperatures, avoid major washing or painting until late spring. However, in milder climates, light touch-ups may be possible on dry days when temperatures are above 50°F, as long as you follow product-specific guidelines for temperature and humidity.
sbb-itb-85e0110
Cleaning, Touch-Up, and Minor Repair Steps
After completing your inspections, it's time to focus on cleaning, touch-ups, and minor repairs. Tackling small issues early helps preserve your exterior paint’s protective qualities, keeping moisture out and preventing expensive repairs down the line.
Safe Cleaning Methods for Painted Surfaces
To keep your exterior paint in good condition, clean it at least once a year. This removes dirt, chalking, and mildew, which can interfere with new paint adhering properly. Before you start, cover nearby plants and outdoor outlets. Mix a mild detergent with water, and using a soft brush or sponge, clean the surface from the bottom up. Rinse with a low-pressure hose - typically under 1,500 psi for siding.
For wood siding, stick to gentler cleaning methods, using hand scrubbing for stubborn spots. If you have fiber-cement siding like James Hardie, follow manufacturer guidelines: use low-pressure water, a non-abrasive cloth or soft brush, and pH-neutral cleaners. Avoid wire brushes or close-range power washing, as these can damage factory finishes and void warranties. Also, be careful not to direct water under lap siding or into joints, as trapped moisture can cause blistering and rot.
Fixing Peeling and Cracking Paint
Once the surface is clean, address any peeling or cracking paint immediately. If your home was built before 1978, test for lead-based paint and follow EPA-approved methods or hire a professional for removal. Start by cleaning and drying the affected area. Use a paint scraper or putty knife to remove all loose, flaking, or bubbling paint. Smooth the edges between bare spots and intact paint with 120–150 grit sandpaper, creating a seamless transition. Fill nail holes with an exterior wood filler or spackling compound.
Re-caulk any gaps after cleaning and removing loose paint. Spot-prime bare or repaired areas with an exterior primer, allowing it to dry completely before applying one or two coats of matching exterior paint. Blend the edges carefully to ensure a smooth finish. Re-caulking every 2–3 years can also help maintain your paint’s weatherproofing.
Treating Rot, Rust, and Mildew
After cleaning and touch-ups, focus on resolving any underlying issues like wood rot, rust, or mildew to prevent them from recurring. These problems need to be addressed at their source, not just covered with paint.
For wood rot, inspect areas like lower trim, window sills, and fascia by probing with a screwdriver. If the wood feels soft or flakes, it’s rotting. Treat small areas with a wood preservative and repair them using an epoxy system before sanding and repainting. However, if the damage is extensive and compromises structural integrity, replace the affected sections with new, primed lumber or moisture-resistant materials. For larger repairs, consider consulting an exterior specialist, such as Bayshore Exteriors, to address underlying causes like faulty flashing or leaky gutters.
For rust on metal surfaces such as railings, flashing, or fasteners, start by cleaning the metal with a degreaser. Use a wire brush or scraper to remove loose rust and flaking paint. If necessary, apply a rust-converting product before priming the surface with a rust-inhibiting metal primer designed for outdoor use. Finish with one or two coats of exterior enamel or metal-specific paint, making sure to cover joints and screw heads thoroughly to prevent moisture buildup.
For mildew or mold, which often shows up as gray, black, or green spots in damp, shaded areas, wear gloves and eye protection while cleaning. Use an exterior mold- and mildew-removal cleaner or a fungicidal wash - avoid relying solely on household bleach, as it may not prevent regrowth. Apply the cleaner with a garden sprayer or brush, let it sit as directed, scrub with a soft-bristle brush, and rinse thoroughly with low-pressure water. Once the surface is completely dry, use a mildew-resistant primer and finish paint. To reduce future mildew growth, improve drainage, ensure gutters are functioning properly, or trim nearby vegetation to minimize moisture buildup.
Scheduled Maintenance and Recordkeeping
Sticking to a regular maintenance schedule not only helps catch small issues early but also makes budgeting and discussions with professionals much easier. These habits work well alongside the seasonal tasks and inspections mentioned earlier.
Maintenance Task Frequency Guide
Exterior paint systems typically last between 5 and 10 years, but their longevity depends on factors like paint quality, siding type, sun exposure, and local climate. For U.S. homeowners, it’s a good idea to visually inspect your exterior 1–2 times a year, usually in spring and fall. Look for signs like peeling, cracking, blistering, or moisture damage. To keep your siding clean, wash it annually with mild soap and low-pressure water to remove dirt, mold, and chalk. Re-caulk joints every 2–3 years, and repair chips or peeling paint as soon as possible to prevent water from seeping in.
For wood siding, plan to repaint every 5–7 years, though harsher climates might require more frequent attention. Fiber cement siding, such as James Hardie, can often go 7–10+ years between repaints when maintained properly and coated with high-quality paint. Adjust your maintenance schedule based on your local conditions. For example:
- Coastal areas: Homes exposed to salt air and wind may need quarterly inspections and more frequent touch-ups.
- Cold regions: Post-winter checks are important to spot ice damage or peeling.
- Hot, sunny climates: South- and west-facing walls may fade or chalk faster.
- Humid areas: Regular checks for mildew and moisture issues are a must.
Once your schedule is set, keeping track of these tasks becomes the next step.
Tracking Your Maintenance History
A detailed maintenance log can be a game-changer for planning future projects and discussing needs with contractors. Whether you prefer paper, a spreadsheet, or an app, make sure to record the following:
- Inspection dates and areas checked (e.g., north wall, trim, windows).
- Issues spotted, such as peeling, cracking, mildew, or caulk failure, along with approximate measurements.
- Materials used, including paint brand, color, sheen, batch number, primer type, and caulk brand, to simplify future touch-ups or color matching.
Save dated photos and logs digitally to spot recurring problems over time. For example, before reaching out to a contractor like Bayshore Exteriors, you can print or share your log and key photos. This helps them quickly understand your maintenance history, identify problem areas, and propose a suitable scope of work. By staying organized, you might notice patterns - like consistent peeling on one wall - that could signal underlying moisture or substrate issues. This approach also allows you to estimate how much life your current paint system has left, helping you plan for a major repaint in advance.
When to Call a Professional
While routine cleaning and touch-ups are manageable for most homeowners, some situations require professional help. If you notice widespread or rapid paint failure - such as large areas of peeling, blistering, or alligatoring - it could point to deeper moisture or substrate problems. Other signs that call for expert evaluation include:
- Persistent moisture issues, like sagging paint, spongy wood, interior stains near exterior walls, or repeated peeling in the same spot.
- Significant wood rot or structural damage to trim, fascia, or siding that can’t be patched.
For complex issues, especially if you’re working with James Hardie fiber cement siding, bringing in a specialist like Bayshore Exteriors can make a big difference. Their expertise in exterior remodeling ensures all elements - siding, trim, flashing, and paint - work together to manage moisture effectively. If you’re dealing with chronic peeling, suspected water intrusion, or rot, their services focus on solving root causes rather than just addressing surface-level problems.
Conclusion
Taking care of your home's exterior paint doesn't have to be complicated. A simple, consistent routine can make all the difference. Start with a yearly inspection to catch any peeling or cracking, pair it with seasonal cleaning, and address small issues like failed caulking or minor chips as soon as you spot them. These straightforward habits can significantly extend the life of your paint and help you avoid expensive repairs. Whether it's spring moisture exposing hidden problems, summer sun fading your walls, or winter ice threatening your trim, early attention to these weather-related stresses can save you a lot of trouble down the road.
Keeping a log with before-and-after photos is a great way to track changes and simplify future projects. If you encounter more serious issues - like widespread peeling, ongoing moisture concerns, significant wood rot, or structural damage - it’s best to call in a professional, such as Bayshore Exteriors, for expert help and lasting solutions.
Why wait? Start this week by inspecting a specific area, like your trim or caulk lines, and set a reminder for your next check-in. Tackling small tasks now will keep your home looking its best and standing strong for years to come.
FAQs
How often should I check the condition of my home's exterior paint?
It's wise to give your home's exterior paint a once-over at least once a year. Regular inspections can help you spot early signs of wear, peeling, or damage - especially after tough weather conditions like heavy rain, snowstorms, or high winds.
To stay ahead of potential problems, try timing these inspections during seasonal changes, like spring or fall. This way, you can tackle any issues right away, keeping your home looking great and shielding it from further damage.
How can I tell if my home's exterior needs repainting?
If your home's exterior is showing signs of wear, it might be time for a fresh coat of paint. Keep an eye out for peeling or cracking paint, which can leave the surface beneath vulnerable to damage. Fading or discoloration is another clue that the paint is no longer doing its job of protecting your home. Watch for mold, mildew, or wood rot, as these issues often require prompt action. Another telltale sign is a chalky or powdery residue on the surface - this means the paint is breaking down and losing its protective layer. By inspecting your home's exterior regularly, you can spot these problems early and keep it looking great while protecting it from the elements.
What steps can I take to protect my home's exterior paint from moisture damage?
To keep your home's exterior paint safe from moisture damage, it’s important to stay proactive. Start with seasonal inspections to spot potential problems before they escalate. Regularly clean the exterior to remove dirt and mildew, as these can hold moisture against the surface. Also, pay close attention to drainage - clear gutters and downspouts, and make sure water is directed away from your home’s foundation.
Another key step is sealing and caulking around windows, doors, and any other openings to block water from seeping in. For a more durable solution, you might opt for weather-resistant materials like James Hardie siding, which is specially made to stand up to moisture and minimize damage risks.
By staying consistent with these practices, you can help your home’s exterior not only look good but also stand up to the elements for years to come.