How Professionals Retrofit Impact Windows Safely
How Professionals Retrofit Impact Windows Safely
Professionally retrofitting impact windows ensures your home is protected during severe storms, meets building codes, and avoids costly issues like leaks or voided warranties. Here's what you need to know:
- Impact windows: Designed to resist hurricanes with strong glass and frames. They stay intact even when cracked, maintaining a barrier against wind and debris.
- Retrofitting: Upgrades existing windows or frames to meet impact standards. Benefits include storm protection, better energy efficiency, noise reduction, and potential insurance savings.
- Why hire professionals: Proper installation is critical for performance. Experts handle permits, ensure code compliance, and avoid errors that could lead to failures during storms.
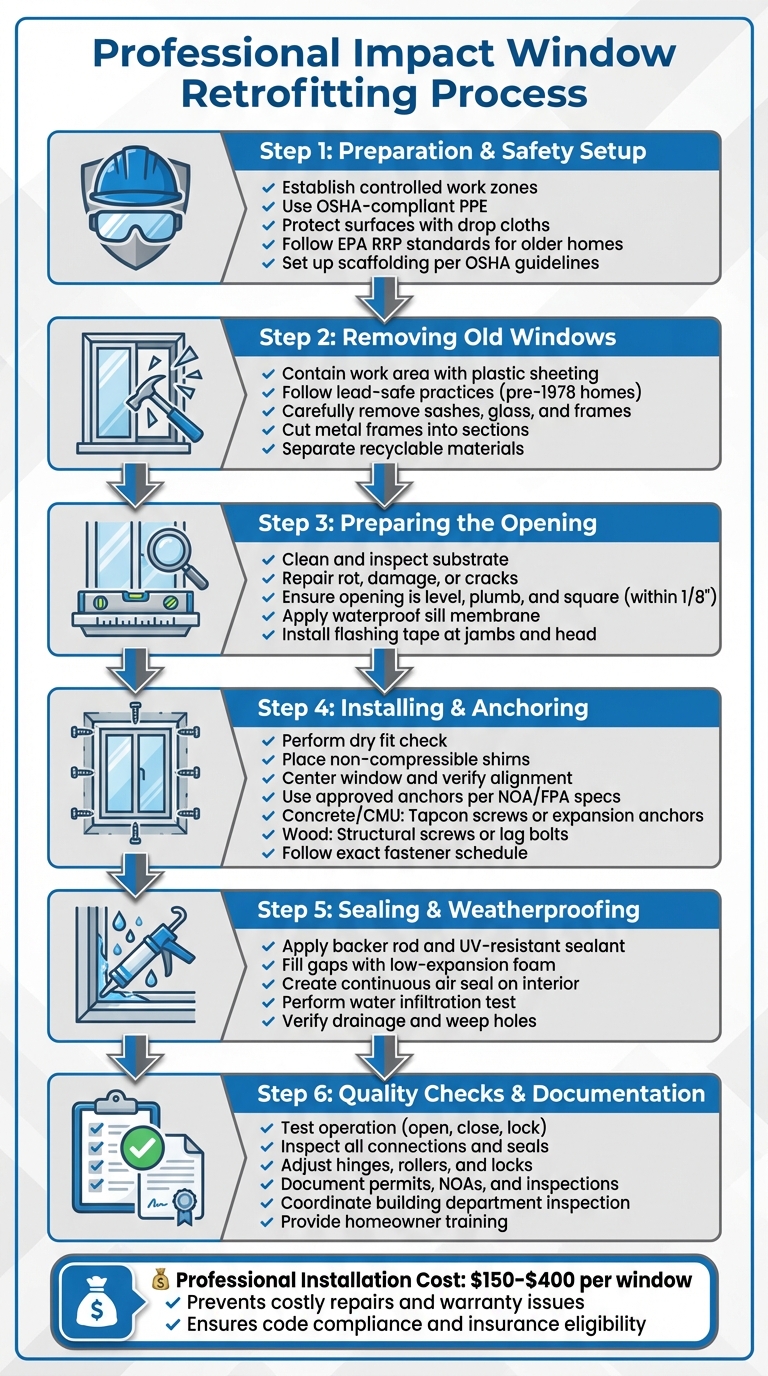
- Key steps: Includes structural assessments, removal of old windows, preparing openings, anchoring new windows, sealing, and weatherproofing.
- Costs: Professional installation typically ranges from $150 to $400 per window, but it prevents expensive repairs down the line.
For those in hurricane-prone areas, professional retrofitting is a smart investment in safety and long-term durability.
Preparation and Safety Requirements
Local Building Code Requirements
Before starting any work, professionals ensure compliance with local building codes by verifying product approvals and securing the necessary permits. For impact windows, installers confirm that each product has an approved Notice of Acceptance (NOA) or Florida Product Approval (FPA) suitable for the specific wind zone of the home. In High Velocity Hurricane Zone (HVHZ) counties like Miami-Dade and Broward, the requirements are even stricter. Products must meet higher design pressures and pass rigorous impact testing. Installers check that each product's approval matches the exact size, configuration, and pressure rating needed for the opening.
A building permit is obtained from the local jurisdiction, and a retrofit package is submitted. This package includes product approvals, wind-load calculations, and a signed layout detailing the size and design pressure for each opening. Installers also coordinate inspections with the building department and ensure permit cards, engineering documents, and product approval sheets are available on-site for inspectors. These steps not only confirm code compliance but also help preserve the home's resale value and may be required by insurers to qualify for windstorm credits.
On-Site Safety Protocols
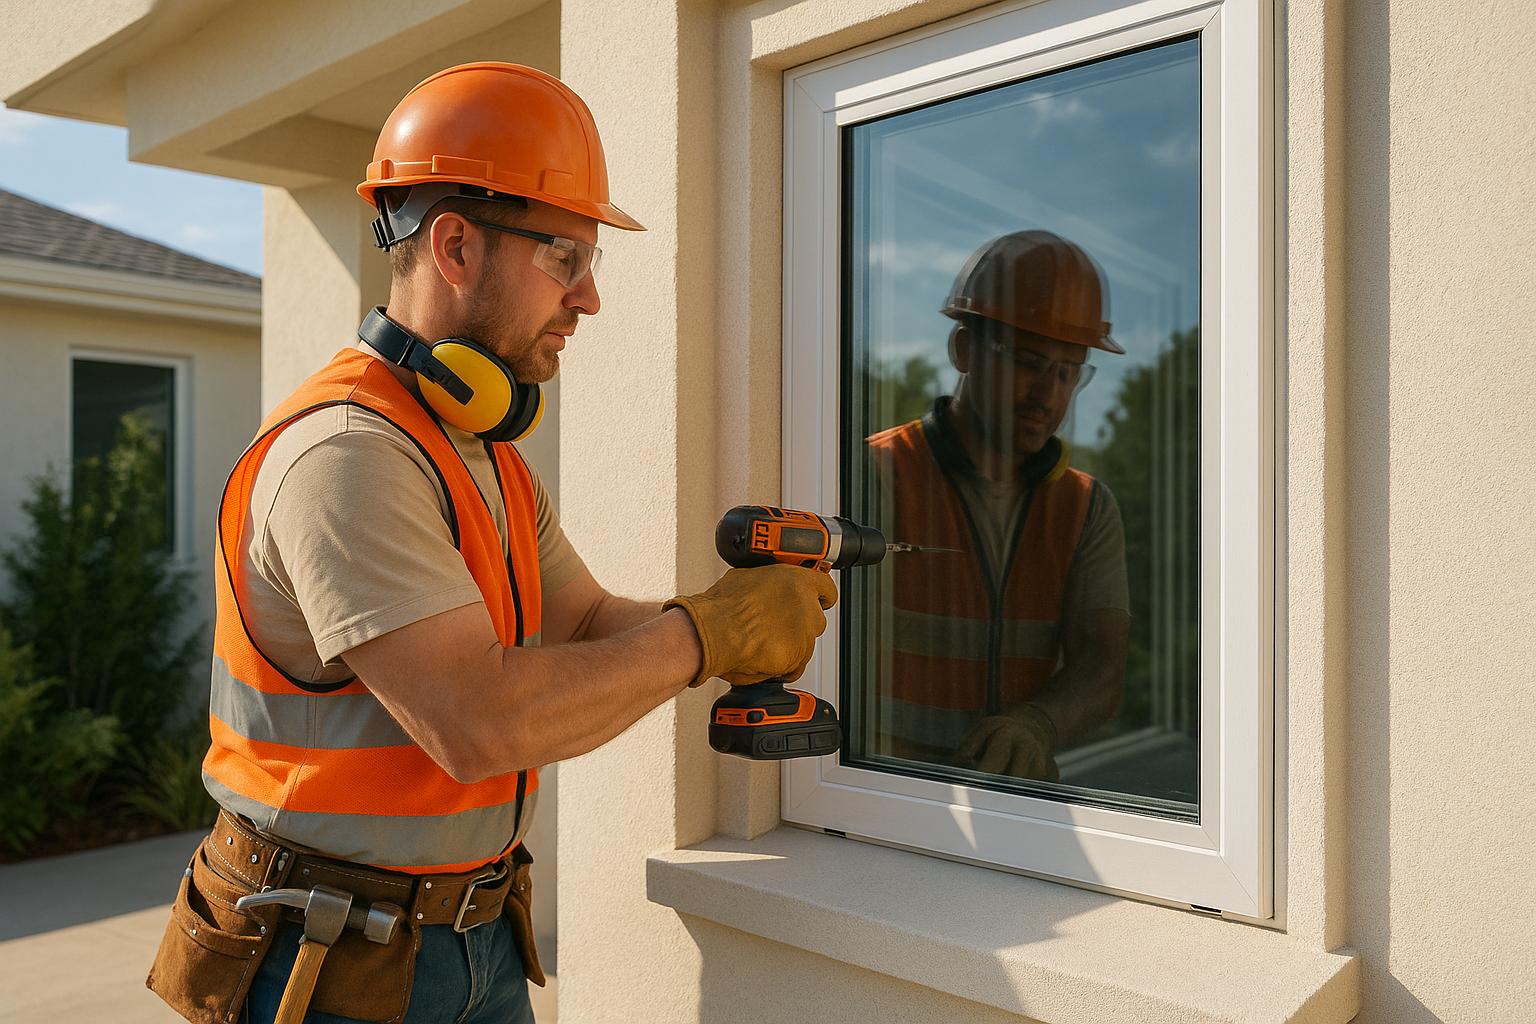
To maintain safety, crews establish controlled work zones and use OSHA-compliant personal protective equipment (PPE). Inside the home, they protect surfaces with drop cloths and keep tools organized to reduce hazards. For work on upper stories, scaffolding or ladders are set up in line with OSHA guidelines to prevent falls and accidents involving dropped objects.
In older homes, professionals follow EPA Renovation, Repair and Painting (RRP) standards to safely handle lead-based paint and other legacy materials. Exterior staging areas are set up away from high-traffic zones like driveways and entryways, and overhead work zones are clearly marked to keep people and vehicles out of harm's way. At the end of each workday, crews secure tools, lock up materials, and ensure all openings are temporarily weather-tight and protected against unauthorized access.
Pre-Installation Structural Assessment
After safety measures are in place, professionals evaluate the structural integrity of the existing openings to ensure proper anchoring. This involves inspecting framing, sheathing, and window openings for signs of damage such as rot, water intrusion, termite activity, warping, or structural movement. Any necessary repairs - like reinforcing studs or replacing damaged sheathing - are completed to meet code and manufacturer specifications.
Installers also determine the wall type, whether it’s concrete block (CMU), poured concrete, or wood framing, and compare it to the anchoring details outlined in the product approval. For masonry, they check embedment depth and edge distances for anchors, while for wood, they ensure framing members are solid where fasteners will be placed. If the structure isn’t sufficient, they may add blocking, reinforce headers, or replace deteriorated materials to align with the design pressures specified in the NOA. Companies like Bayshore Exteriors provide homeowners with detailed preparation checklists, making it clear how safety, code adherence, and structural soundness are achieved during the retrofitting process.
How To Install Impact Windows on Concrete Block Homes - STEP BY STEP
The Retrofitting Process
Professional Impact Window Retrofitting Process: 6 Essential Steps
Removing Old Windows or Doors
To keep the work area clean and protect nearby surfaces like drywall, trim, flooring, and siding, professionals use plastic sheeting and drop cloths. In homes built before 1978, they follow EPA RRP lead-safe guidelines, which include containing dust, misting, and promptly bagging debris to minimize exposure to lead-based paint hazards.
The removal process starts with old sashes, glass, and frames, which are carefully taken apart using hand tools to avoid unnecessary damage. Installers cut through paint and caulk lines with a utility knife and use gentle prying techniques to protect the surrounding materials. Fasteners are removed with precision to prevent structural harm, and any broken glass is handled with cut-resistant gloves and disposed of in rigid containers, adhering to local regulations. For metal frames, such as aluminum or steel, saws or reciprocating tools are used to cut them into smaller sections, which are then removed piece by piece to avoid cracking stucco or masonry. Recyclable materials like metal are separated, while glass, treated wood, and sealants are sent to approved disposal facilities.
With the old components out, the team prepares the opening for the new impact window.
Preparing the Window Opening
Once the old window or door is removed, installers clean the opening by scraping away old caulk, foam, shims, and debris. This ensures the substrate is visible and ready for inspection. The sill, jambs, and header are checked for signs of rot, insect damage, corrosion, or cracks. If any framing members are compromised, they are repaired or replaced to ensure the structure can handle the high wind loads associated with impact windows. Cracks or voids in concrete or masonry are patched using appropriate mortar or repair compounds to create a solid base for anchoring.
Next, the opening is adjusted to ensure it is level, plumb, and square. Any deviations beyond 1/8 inch are corrected using shims or planing. To promote proper drainage, the rough sill is sloped or shimmed before applying a self-adhered waterproof sill membrane. This membrane typically wraps up the jambs and, in stucco or masonry applications, may extend onto the exterior surface. It is integrated with existing housewrap or weather-resistant barriers using shingle-style layering to direct water outward. Additional flashing tape or preformed flashing pans are installed along the jambs and head, with reinforced corners to prevent leaks.
Installing and Anchoring Impact Windows
Before installation, a dry fit is performed to check clearances. Non-compressible shims are placed at bearing points along the sill and, in some cases, at hinge or lock locations on the jambs. The window is then set into the opening - either from the interior or exterior, depending on the design - and centered for an even reveal. Temporary fasteners hold it in place while the alignment is rechecked. The sash is operated and locked to ensure smooth movement, an important step since the heavy laminated glass in impact windows can amplify even minor misalignments.
The type of anchors and their placement are determined by the window’s product approval or engineering documents. These guidelines specify the design pressure ratings, suitable substrates (such as concrete, CMU, or wood), and the exact fastener schedule for the frame size. For concrete and CMU, heavy-duty tapcon screws or expansion anchors are commonly used, while wood framing typically requires structural screws or lag bolts installed through pre-drilled holes into studs or bucks. Fasteners are placed at specified intervals, often closer together at corners and mullions, to ensure the frame can handle both positive and negative pressures without excessive deflection. They are tightened snugly to avoid deforming the frame.
Once the window is securely anchored, the process moves to sealing and weatherproofing.
Sealing and Weatherproofing
To create a weatherproof seal, professionals use low-expansion foam or backer rod along with UV-resistant, ASTM-rated sealant. The exterior perimeter joint is sealed over a backer rod, forming a flexible, hourglass-shaped profile that accommodates thermal expansion. The gap between the frame and substrate is filled with low-expansion foam or mineral fiber insulation to reduce drafts and heat loss.
On the interior, a continuous air seal is applied where the frame meets drywall or trim, improving HVAC efficiency and indoor comfort - especially in hot, humid, or coastal areas. Once the sealants and foams cure, they are carefully inspected and tooled to eliminate any gaps. If any issues are found, such as voids or leaks, they are corrected before installing interior casing or exterior trim.
Many crews also perform water tests, using a hose or controlled spray to check for leaks around the frame. If water or air movement is detected, adjustments are made, such as re-tooling sealant, reinforcing flashing overlaps, or adding more foam or backer rod. Only after these checks is the joint fully covered.
sbb-itb-85e0110
Quality Checks and Final Steps
Testing and Inspections
Once the sealing process is complete, professionals carry out a thorough inspection of every newly installed impact window and door. They open, close, and lock each unit multiple times to ensure smooth operation, proper latch engagement, and accurate alignment of sashes or panels. This step ensures everything works as it should before the final handoff to the homeowner.
Installers also carefully examine frame-to-wall connections, shims, fastener heads, sealant joints, flashing, and gaskets to confirm they meet both manufacturer guidelines and local building codes. They check for continuous coverage and address any gaps that might allow air or water to seep through. Many crews even perform a basic water-infiltration test using a controlled hose to identify leaks at corners, mullions, or sill interfaces. They also verify that drainage systems and weep holes are clear and functioning properly.
To ensure long-term performance, precise adjustments are made. For instance, hinge screws, roller assemblies, and keeper plates are fine-tuned so locks engage securely without excessive force. Weatherstripping and gaskets are inspected and reseated, with any damaged sections replaced to maintain a tight seal when windows are closed. Thresholds and sills are checked for proper slope and sealing, and doors are tested to ensure they open and close smoothly without dragging.
Once all performance checks are complete, professionals document every detail to meet code and warranty requirements.
Documentation and Code Verification
Detailed documentation is a critical step. This includes permits, inspection tags, product approvals or Notices of Acceptance (NOAs), and engineering documents. These records are cross-checked against manufacturer guidelines and local codes to ensure compliance. They outline design pressures, fastening patterns, and structural details for each opening, with fastener schedules specifying anchor types, diameters, lengths, embedment depths, and spacing.
Installers also measure fastener embedment depth into the structural substrate and confirm spacing aligns with approved plans. This ensures the installation meets both engineering drawings and local building codes.
For retrofits requiring permits, contractors coordinate inspections with the local building department. During these inspections, contractors provide all necessary documentation and work closely with inspectors to verify fastener patterns, sealant applications, flashing, and overall workmanship. Any comments or corrections from inspectors are addressed promptly. Once the final inspection is approved, homeowners receive signed inspection cards or digital approvals. These documents not only confirm compliance with local building codes but can also be crucial for securing insurance discounts or aiding in future resale.
With testing and documentation complete, the final step involves educating homeowners on how to operate and care for their new installations.
Homeowner Training
During the final walkthrough, professionals take the time to show homeowners how to properly use and maintain each type of window and door. For single- and double-hung windows, they demonstrate unlocking, raising and lowering sashes, and engaging tilt-in features for easy cleaning. Sliding windows and doors are covered as well, with instructions on unlocking, sliding heavy panels, using secondary locks, and keeping tracks clear. For casement and awning windows, they explain how to use crank handles and lock them securely without forcing against obstructions.
Emergency exit windows and doors are identified, and homeowners are shown how to open them quickly without tools. Safety tips are shared, such as avoiding hanging heavy items from window handles and not slamming impact doors.
Clear maintenance guidelines are provided to help homeowners preserve the performance of their new installations and keep warranties intact. Cleaning recommendations include using mild soap and water with a soft cloth for glass and frames, while avoiding abrasive pads or harsh chemicals that could damage coatings and gaskets. Locks, hinges, and rollers should be cleaned and lightly lubricated with approved products, particularly in coastal areas where salt exposure can accelerate wear. Homeowners are encouraged to keep tracks, sills, and weep holes free of debris to prevent drainage issues that could lead to leaks or void warranties.
Lastly, professionals review warranty conditions, including the importance of professional service, deadlines for reporting defects, transferability, and the need to retain documentation. They also advise homeowners to visually inspect perimeter joints annually and contact a professional if they notice any cracking or separation at the frame-to-wall interface.
Benefits of Professional Retrofitting Services
When to Hire a Professional
In situations where risks are high, professional retrofitting becomes a necessity. For homes located in areas prone to hurricanes or strong winds, compliance with local building codes, specific product approvals, and proper documentation are non-negotiable. These requirements are best handled by professionals who understand permitting processes and have the necessary expertise. Similarly, older homes often need repairs before new installations can be safely completed, making professional guidance invaluable.
For multi-story buildings, the complexity increases. Heavy materials, specialized equipment, and trained crews are essential to ensure the work is done safely and without compromising the building's structural integrity. Homes with diverse exterior materials or a history of water intrusion also benefit from professional attention, as proper flashing and sealing are critical to prevent leaks down the road.
While professional installation costs typically range from $150 to $400 per window, this upfront expense can save homeowners from costly issues like water damage, structural repairs, or early replacements caused by subpar installation. These potential problems highlight why hiring experienced professionals is a smart choice.
Working with Bayshore Exteriors

One company that consistently meets these high standards is Bayshore Exteriors. With extensive knowledge of Florida’s climate and architectural styles, they ensure every installation is tailored to meet regional wind-load requirements while blending seamlessly with the home’s design.
Bayshore Exteriors goes beyond basic installation. They combine code-compliant methods with expertise in siding, waterproofing, and exterior design to deliver installations that are not only functional but also visually appealing. Their process includes a detailed consultation, careful planning, skilled installation using top-quality materials, and meticulous finishing touches. The result? Impact windows that enhance both the safety and beauty of the home while respecting its architectural character.
To top it off, Bayshore Exteriors offers a lifetime workmanship warranty and a 100% satisfaction guarantee, providing homeowners with peace of mind and confidence in the quality of their work. Their dedication to craftsmanship and long-term reliability sets them apart as a trusted partner in retrofitting services.
Conclusion
Retrofitting impact windows is a crucial safety measure that requires expert installation and strict adherence to building codes. Every stage - starting with a structural assessment and permit approval, followed by careful removal, secure anchoring with hurricane-rated fasteners, and proper waterproofing - is essential to ensure your windows perform as intended during severe storms.
A professional installation not only protects your home but also helps you avoid costly issues like water leaks, structural problems, failed inspections, or voided warranties. For those living in hurricane-prone areas, particularly along Florida's coastline, this upgrade is more than just a safety measure - it’s an investment in energy efficiency and peace of mind. Compared to the expense of storm damage or insurance headaches caused by subpar work, professional retrofitting is a smart and cost-effective choice.
If you’re ready to ensure your home meets Florida’s stringent building standards, Bayshore Exteriors can help. Their team has extensive experience with Florida’s unique weather challenges and regulations. They’ll assess your home’s existing openings, discuss your needs and preferences, and create a detailed plan to retrofit your impact windows with precision and care. This way, your home will be well-prepared for the next storm season - and many more to come.
Don’t take risks with your home’s safety. Professional retrofitting provides the strength, durability, and reliability your home deserves.
FAQs
Why should you hire professionals to retrofit impact windows?
Hiring experts to install impact windows guarantees the work is done safely, accurately, and in line with local building codes. This minimizes the chances of mistakes that could lead to damage or safety risks during extreme weather.
These professionals come equipped with the skills and tools needed to ensure a proper installation. This not only enhances the durability of the windows but also ensures they perform effectively in shielding your home from storms, flying debris, and impacts. Their precision helps protect your investment and offers long-term peace of mind.
How do professionals ensure retrofitted impact windows meet building codes?
Professionals make sure retrofitted impact windows align with local building codes by keeping up-to-date on regional regulations and securing necessary permits before beginning any installation. They adhere to manufacturer instructions for correct installation and use approved materials to meet safety and performance criteria.
Inspections are carried out during the process to confirm compliance, ensuring the installation meets all code requirements. This attention to detail provides both safety and long-lasting durability for your home.
How do professionals ensure safety when retrofitting impact-resistant windows?
When professionals install impact-resistant windows, safety is at the forefront. They follow exact installation methods and stick closely to manufacturer instructions. One key step is securing the windows with reinforced framing, which boosts structural strength and ensures the windows can handle harsh conditions.
Experts also thoroughly examine the surrounding structure to make sure it’s strong enough to support the new windows. This careful inspection helps avoid potential damage, guarantees a snug fit, and ensures the installation is as safe and long-lasting as possible.