How to Install Gutter Guards: Step-by-Step Guide
How to Install Gutter Guards: Step-by-Step Guide
Gutter guards can save you time, reduce maintenance, and protect your home from water damage. These covers prevent debris like leaves and twigs from clogging your gutters, ensuring rainwater flows smoothly. Whether you’re considering a DIY installation or hiring a professional, this guide covers everything you need to know.
Key Takeaways:
- Why Install Gutter Guards?
They reduce cleaning by up to 70%, prevent costly repairs, and improve safety by minimizing ladder use. - Types of Gutter Guards:
Options include micro-mesh, screens, foam inserts, brush guards, and surface tension systems, with prices ranging from $0.50 to $7.66 per linear foot. - Tools Needed:
Ladder, measuring tape, tin snips, drill, screws, gloves, and safety gear. - Installation Steps:
- Clean and inspect gutters.
- Measure and cut guards to fit.
- Secure guards with screws or clips.
- Maintenance Tips:
Clean guards 1-2 times a year and inspect for damage after storms.
Tip: Always measure your gutters accurately and review your roof warranty before installation to avoid issues. For a more durable and efficient system, micro-mesh guards are often the best choice.
Read on for a detailed guide on tools, safety, and step-by-step instructions.
How to Install Gutter Guards Like a Pro (Step-by-Step Guide)
Tools and Materials You'll Need
Before diving into the installation process, make sure you’ve gathered all the necessary tools and materials. This will save you time, reduce frustration, and help you focus on working safely.
Required Tools
For a smooth gutter guard installation, you’ll need a few essential tools: a sturdy ladder, measuring tape, tin snips, a screwdriver or drill with self-tapping screws, and a good pair of work gloves. Don’t forget safety gear like gloves and safety glasses to protect yourself during the job.
Accurate measurements and secure installations are key, so tools like a level, tin snips, and a drill or screwdriver will come in handy. While not mandatory, specialty tools such as gutter hangers, end cap crimpers, or outlet punches can make certain tasks much easier. Always remember to measure twice before cutting to minimize errors, and ensure screws are fastened tightly to keep the guards in place.
Materials to Buy
Gutter guards come in a variety of materials, including plastic, aluminum, steel, vinyl, or copper, and can be found in styles like screens, micro-mesh, foam, brush, hooded, or hybrid. Prices typically range between $0.50 and $7.00 per linear foot, depending on the material and design.
When choosing materials, think about the type of debris common in your area. For instance, micro-mesh guards are excellent for keeping out small debris but can be trickier to install. On the other hand, foam and brush guards are easier to install but may need more frequent cleaning. Measure the total length of your gutters to determine how much material you’ll need, and buy a little extra to account for mistakes or manufacturing defects. Make sure your chosen guards are compatible with your gutter system - whether it’s K-style or half-round - and match your roofing setup. Additional items like mounting clips, silicone sealant, and sheet metal screws (especially for areas prone to high winds) may also be necessary.
Once you’ve selected your materials, it’s time to shift your focus to creating a safe work environment.
Safety Setup
Safety should always come first when working on gutter guard installation. Ladder safety, in particular, is critical. In the U.S., ladder-related falls send over 164,000 people to emergency rooms each year, with hundreds of fatalities.
"It's crucial to have safety at the forefront of your mind when using ladders for gutter inspection."
Choose a ladder that’s the right height for your gutters, inspect it for any damage, and set it on a stable, flat surface. Follow the 4-to-1 rule for proper stability: for every four feet of ladder height, the base should be one foot away from the wall. Having someone hold the ladder while you work adds an extra layer of safety.
"Always maintain three points of contact - two hands and one foot or two feet and one hand - while climbing. This helps ensure balance and stability."
Wear protective gear like a hard hat and slip-resistant shoes. Never overreach while on the ladder; instead, move it as needed to avoid losing your balance. Be mindful of power lines, keeping at least 10 feet away, and avoid working in bad weather conditions like rain, wind, or snow. A ladder stabilizer can offer additional security, and a tool belt or hoist is a smart way to carry tools without risking a fall. If you’re working near a door, either lock it or post a sign to prevent someone from accidentally opening it while you’re on the ladder.
Preparation Steps
Getting your gutter guards to perform well over the long term starts with proper preparation. This means cleaning your gutters, taking accurate measurements, and reviewing your roof warranty before installation.
Clean and Inspect Your Gutters
To ensure your gutter guards work effectively, start with clean and functional gutters. Installing guards over clogged or damaged gutters won’t solve existing problems.
Begin by clearing out debris. Start near the downspout and work your way toward the closed end of each gutter. Use gloves to remove large debris like leaves and twigs by hand, and a trowel or gutter scoop to loosen any compacted material. Once the big stuff is gone, flush the gutters with a hose to remove dirt and check for proper drainage. Don’t forget to spray water into the downspouts to make sure they’re free of clogs.
While the gutters are still wet, inspect them for cracks, holes, or loose joints. Check that all sections are securely attached because loose gutters won’t support guards properly. According to The Home Depot's updated gutter cleaning guide (October 2024), homeowners should clean their gutters twice a year - once in early spring and again in early fall - to avoid costly repairs.
Once your gutters are clean and in good shape, take measurements to ensure a proper fit for your guards.
Measure Your Gutters
Getting the right fit for your gutter guards depends on accurate measurements. Start by measuring the width of each gutter section. Place your tape measure at the outer lip of the gutter and extend it straight back to the fascia, just under the roofline. This will help you determine the correct size.
Next, identify your gutter type. Most homes in the U.S. have 5- or 6-inch K-style gutters, but you might have half-round, fascia, or custom gutters. For K-style gutters, measure from the back of the gutter to the outermost edge. If you have fascia gutters, note that they often work with 5-inch guards that have a 4.25-inch diameter.
Walk around your home and measure the length of each gutter section in feet and inches. Add these lengths together to calculate the total linear footage you’ll need. If you’re unsure about sizing, many manufacturers offer samples you can test-fit, which is especially useful for brush-style guards.
Before moving forward with installation, take a moment to check your roof warranty.
Check Your Roof Warranty
Your roof warranty is another critical factor to consider before installing gutter guards. Using the wrong installation methods - like screws that penetrate the roof or lifting shingles - can void your warranty and create water seepage issues. Additionally, some gutter guards might affect your roof’s ventilation system, which is essential for keeping moisture, mold, and rot at bay.
Carefully review your warranty documents to see if there are any restrictions on modifications or attachments. In some cases, the area where gutter guards are installed might not be covered by the manufacturer or roofer.
To avoid problems, steer clear of attaching guards directly to the roof with screws. Instead, use clips or other non-invasive options. GAF, a leading roofing manufacturer, notes that "in almost all instances, the products are installed following good roofing practices and do not have an impact on the roofing manufacturer's warranty". Always follow the installation guidelines provided by your gutter guard manufacturer. If you’re hiring a contractor, choose someone experienced with your specific roof type to help keep your warranty intact.
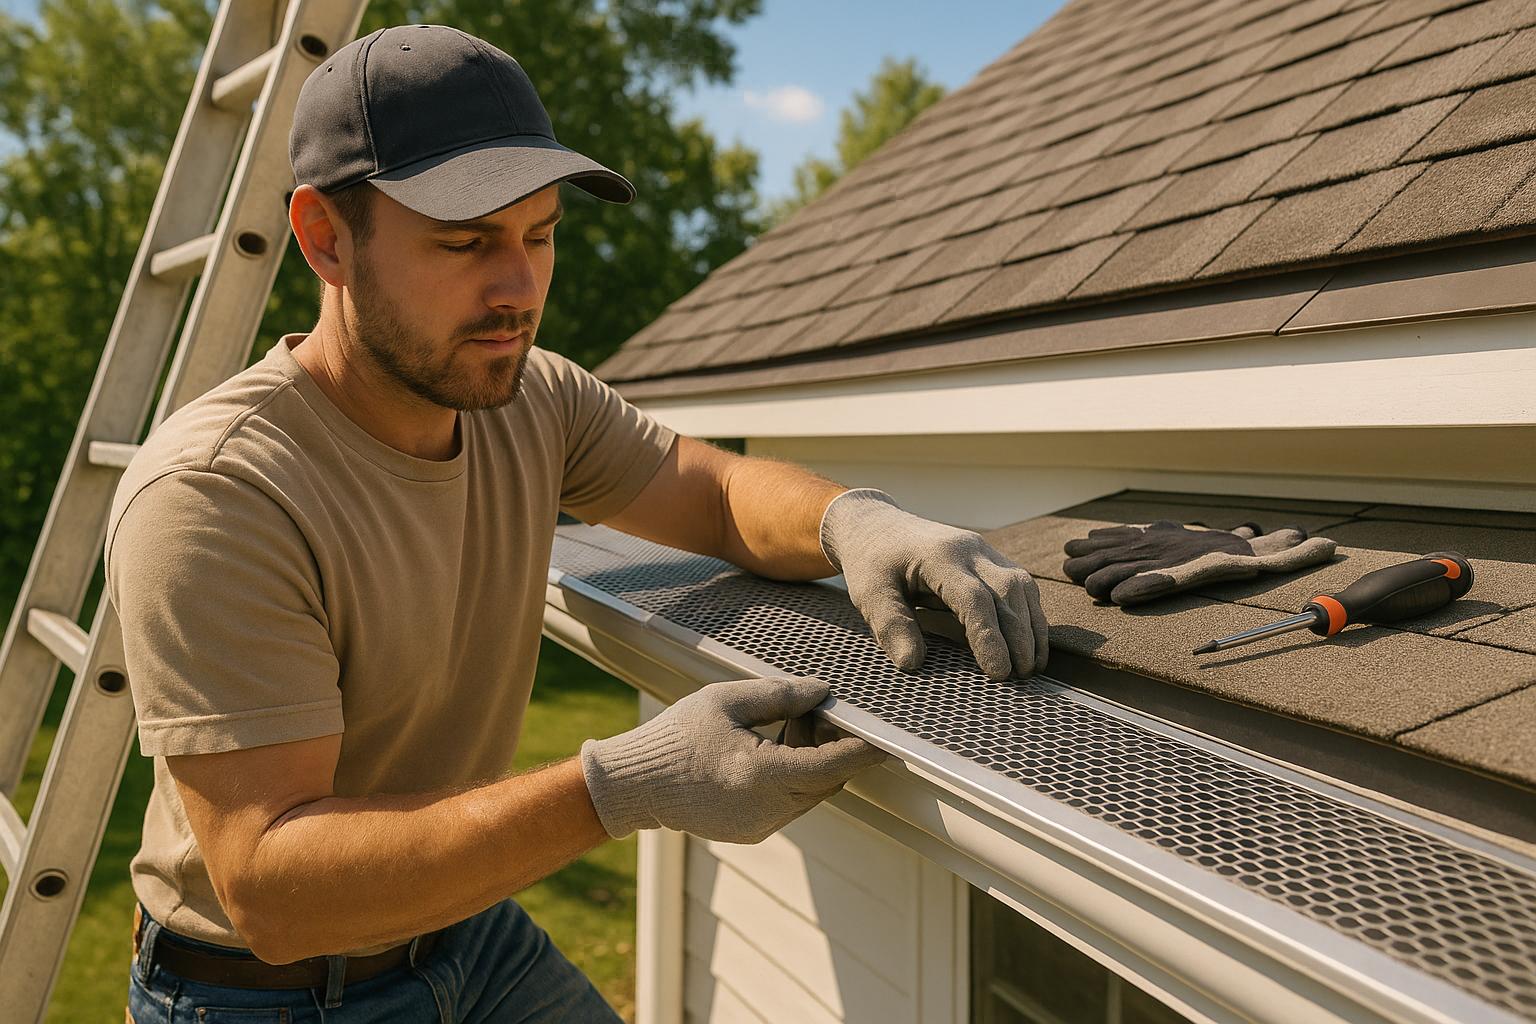
Installation Steps
With your gutters cleaned and measured, you're ready to install the guards. While the specifics can vary depending on the type of guard you’ve chosen, the overall process is fairly consistent for most systems.
Cut Guards to Fit
Gutter guards typically come in 3- to 4-foot sections, so you’ll need to trim them to fit your gutters. When you reach the end of a gutter run, carefully measure the remaining space. Mark your measurement on the guard, then cut along the line using tin snips or heavy-duty shears.
Make sure your cuts are straight for a snug fit. If you’re working with mesh-style guards, take your time cutting to avoid fraying the material. For guards with ridges or corrugated surfaces, position your tin snips perpendicular to the ridges for a cleaner cut.
Place the Guards
Once the guards are cut, it’s time to position them. The placement method depends on the type of guard and your roof’s setup. For guards that slide under shingles, gently lift the bottom edge of the shingles and slide the guard’s back rail underneath. Be careful not to crack or damage the shingles. Align the guard so it sits flush against the front edge of the gutter.
For snap-on or clip-style guards, place them directly over the gutter opening. Ensure the guard aligns with the slope of the gutter to allow water to flow properly and prevent pooling that could lead to overflow.
When installing multiple sections, focus on the joints between guards. Overlap the mesh tabs at the ends of each section to avoid gaps where debris could sneak in. This overlapping is key to ensuring your gutter system is fully covered.
Attach and Finish
Properly securing the guards is essential to keep them in place during storms or high winds. Use self-tapping screws to attach the guards to the front lip of the gutter or fascia board, but avoid screwing directly into the roof.
For FireStorm Gutter Guards, use the provided self-drilling Daggerz® fasteners and a magnetic hex-driver. Secure each guard with three evenly spaced fasteners along the front edge.
If your snap-on guards feel loose, drill in screws every few feet for added stability - especially in areas prone to high winds.
Once installed, inspect the entire system. Make sure all guards are securely attached and there are no gaps between sections. Give each guard a gentle tug to test its hold. If any sections feel loose, re-secure them immediately to avoid issues during storms.
sbb-itb-85e0110
Maintenance and Troubleshooting
Even the best-installed gutter guards need occasional upkeep to keep them working efficiently and to avoid costly repairs. Staying on top of maintenance is far easier than dealing with clogged gutters, and catching issues early can save you a lot of hassle and money.
Regular Cleaning and Inspection
Plan to clean your gutter guards at least once or twice a year. If you live in an area with lots of trees or experience frequent storms, you might need to clean them three or four times annually. The most effective times for inspections are after heavy storms or during seasons when leaves are falling heavily. While inspecting, check for damage like cracks, rust, or loose sections in the guards. Pay close attention to the joints where debris often builds up.
Use gentle cleaning tools to avoid causing damage. A soft brush or a leaf blower works well for clearing surface debris, while a garden hose can help flush out stubborn buildup, ensuring water flows smoothly through the downspouts. Avoid harsh chemicals or abrasive tools, as these can harm the guard material or even void warranties.
Don’t forget to inspect your downspouts during these checks. Make sure they’re free of blockages and water is flowing properly from the gutters to the ground. Incorporating gutter guard maintenance into your overall home care routine can help you spot and address small issues before they turn into bigger problems.
Fixing Common Problems
Sometimes, even with regular cleaning, you might run into issues. Here are a few common problems and how to handle them:
- Debris Build-Up: Over time, debris can create a slimy layer that clogs the system. Regular sweeping of the guards helps prevent this and keeps them functioning properly.
- Overflowing Water: If water spills over the gutters during rain or if the guards lift out of place, check for blockages or loose fasteners. Tighten screws where needed, especially in areas prone to high winds. If sections have come completely loose, secure them immediately to prevent further damage during storms.
- Ice Dams and Icicles: Ice buildup can be a problem in colder months. Use calcium chloride to safely melt ice without damaging the guards.
- Moss and Algae Growth: Over time, moss or algae can clog gutters. Use a soft brush to scrub affected areas and rinse thoroughly. Trimming nearby trees can also reduce the amount of organic debris that falls into your gutters.
If your gutter guards seem to underperform, it might be due to choosing the wrong type for your home or improper installation. In such cases, reassess the guard style to better suit your home’s water flow needs.
For persistent problems, it’s a good idea to bring in a professional. What seems like a gutter guard issue might actually be related to gutter alignment, roof pitch, or other structural factors that require expert evaluation.
Types of Gutter Guards Compared
Once you’ve got the basics of gutter guard installation down, it’s time to dive into the details of each type. Picking the right gutter guard isn’t just about price - it’s about finding the best fit for your home’s climate, the kind of debris you deal with, and your budget. Understanding these options can help you make a choice that saves both time and money in the long run.
Gutter guard prices vary widely, from $0.70 to $7.66 per linear foot, with 45% of homeowners reporting they spent between $2,000 and $3,000 for complete installation.
When deciding, think about what you’re trying to block. In a 2025 survey, 91% of homeowners said their top concern was keeping leaves out, while 49% prioritized preventing squirrels from causing damage. Below, we break down the main types of gutter guards, their costs, durability, and where they work best.
"Gutter guards help prevent clogs and reduce maintenance by blocking debris, but choosing the right type depends on your climate, debris type, and home layout."
Micro-Mesh Guards
These are the top-tier option for gutter protection. With ultra-fine holes, micro-mesh guards can block even the tiniest debris, like pollen and shingle granules. Made from durable materials like stainless steel, they’re built to last and work well in all climates. However, they typically require professional installation. Once installed, they need very little upkeep.
Mesh Screens
Mesh screens are a balanced choice. Their slightly larger holes can handle medium to large debris effectively, and they’re durable enough for most climates. Many homeowners appreciate that these can often be installed as a DIY project, making them a practical option.
Brush Guards
Brush guards are ideal for handling larger debris like pine needles. They’re simple to install and require moderate maintenance, but they can struggle in wet climates where debris tends to stick to the bristles. The brush design allows water to flow through, but they’re better suited for drier conditions.
Foam Inserts
If you’re on a tight budget, foam inserts might be worth considering. These fit directly into your gutters and are easy to install. However, they don’t last long, often trapping debris and moisture, and they’re best used in dry environments where they won’t degrade as quickly.
Surface Tension Helmets
Using a curved design, surface tension helmets let water flow into the gutters while debris slides off to the ground. They’re great for managing heavy rainfall and large debris but usually require professional installation. These guards are more expensive to maintain and work best in rainy or temperate climates.
PVC Covers
PVC covers are the most budget-friendly option. They’re mildew-resistant and work well in moderate climates, but they can be tricky to install correctly. Additionally, they may crack in extremely cold weather, making them less reliable in icy conditions.
Guard Type Comparison Chart
Here’s a quick side-by-side look at the key features of each type:
| Guard Type | Cost per Linear Foot | Material Durability | Installation | Maintenance | Best Climate |
|---|---|---|---|---|---|
| Micro-Mesh | $7.53 | High (stainless steel) | Professional recommended | Minimal | All climates |
| Mesh Screen | $2.50 (range: $1–$4) | Moderate to High | DIY-friendly | Moderate | Various climates |
| Brush Guards | $7.66 | Moderate | Easy DIY | Moderate | Dry climates |
| Foam Inserts | $6.31 | Low (2–5 years lifespan) | Very easy DIY | High | Dry environments only |
| Surface Tension | $6.00 | High (10+ years) | Professional required | Low | Rainy/temperate climates |
| PVC Covers | $0.70 | High | Moderate difficulty | Low | Temperate (avoid extreme cold) |
Choosing Based on Climate
Your local climate plays a huge role in determining the right gutter guard for your home. If you live in a rainy, forested area, go for micro-mesh guards with reinforced frames to handle heavy rainfall and falling leaves. For snowy or icy regions, reverse-curve or heated guards can help prevent ice dams - just steer clear of plastic guards, as they can become brittle in freezing temperatures. In hot, dry areas, foam inserts or perforated aluminum guards made from fire-resistant materials are a better choice, especially in wildfire-prone zones.
"There is no such thing as a maintenance-free gutter guard. All gutter protection systems require occasional upkeep to function properly." - Senox
Keep in mind, no gutter guard is completely maintenance-free. Even the best systems need periodic cleaning and inspection. The goal is to pick a solution that significantly reduces your workload while staying within your budget and addressing your home’s specific needs. Think about factors like the trees around your property, your roof’s slope, and the weather patterns in your area before making your final call.
Final Thoughts
Installing gutter guards can be a game-changer for homeowners, offering both time savings and protection against water damage. The process - measuring, selecting, cutting, and securing - is straightforward enough for many DIY enthusiasts to tackle over a weekend. And the payoff? Long-term benefits that make the effort worthwhile.
One of the biggest perks of gutter guards is the reduction in maintenance. Many homeowners find they only need to clean their gutters once a year after installing them. Plus, with 69% of homeowners expressing high satisfaction with their gutter guards' performance, this upgrade can take the hassle out of one of the more tedious aspects of homeownership.
Beyond convenience, properly installed gutter guards serve a bigger purpose. They shield your home’s foundation, siding, and landscaping from water damage, help deter pests, and even extend the lifespan of your gutter system. On top of that, they reduce the risks of climbing ladders frequently for maintenance, which is a welcome safety bonus.
If you’re considering a DIY approach, mesh screens and brush guards are great options to start with. However, more advanced systems like micro-mesh or reverse-curve guards may require professional installation. If you’re not comfortable working on ladders or want the added assurance of a warranty, hiring a professional might be the smarter route. Regardless of the system you choose, plan to inspect and clean your gutters at least twice a year to keep them working at their best.
For homeowners looking for expert guidance, companies like Bayshore Exteriors can help. They’ll assist in selecting the right gutter guard system tailored to your home and local climate, ensuring it’s installed correctly for maximum performance.
FAQs
What should I keep in mind when selecting gutter guards for my home?
When choosing gutter guards, it’s important to consider the type of debris your gutters typically encounter. For instance, if your home is surrounded by pine trees, you’ll want guards specifically designed to handle small needles. On the other hand, if you’re dealing with leaves from deciduous trees, you’ll need guards that can manage larger debris.
Another crucial factor is durability. Materials like stainless steel and aluminum are not only sturdy but also excel at keeping out smaller debris. Make sure the guards fit your gutters snugly - any gaps could allow debris to sneak through, defeating their purpose.
Ease of installation and maintenance is also worth thinking about. A guard that’s simple to install and requires minimal upkeep can save you both time and hassle over the years.
Will installing gutter guards affect my roof warranty?
Installing gutter guards usually won't affect your roof warranty, provided they are put in place correctly and follow the manufacturer's specifications. To prevent any problems, make sure the installation process avoids damaging shingles, obstructing roof vents, or interfering with other essential roof elements. Opting for professional installation by experienced companies like Bayshore Exteriors can help protect your warranty and ensure the work is handled properly.
What are the best ways to maintain gutter guards for long-term performance?
To keep your gutter guards working efficiently, make it a habit to clean them at least twice a year - spring and fall are the best times. You can use a soft brush, a leaf blower, or gently rinse them with water to clear out any debris that might clog airflow or block water drainage.
Beyond regular cleaning, it’s a good idea to schedule a professional inspection once a year. This can help identify issues like rust, pest damage, or general wear and tear before they turn into bigger problems. Taking these steps not only prevents water overflow but also helps your gutter guards last longer, ensuring your home stays well-protected over time.