How to Install Mineral Wool Under Siding
How to Install Mineral Wool Under Siding
Mineral wool insulation under siding improves energy efficiency, fire resistance, and soundproofing, while also being moisture-resistant and eco-friendly. It outperforms fiberglass in R-value, durability, and environmental impact.
Key Benefits:
- Energy Efficiency: Higher R-value (R-15 for 2×4 walls vs. fiberglass's R-11 to R-13).
- Fire Resistance: Withstands temperatures over 1832°F.
- Moisture Resistance: Repels water and maintains insulation properties.
- Soundproofing: Blocks up to 95% of sound.
- Eco-Friendly: 70% recycled content and reduces CO₂ emissions over time.
Quick Comparison:
| Feature | Mineral Wool | Fiberglass |
|---|---|---|
| R-Value (2×4) | R-15 | R-11 to R-13 |
| Fire Resistance | Non-combustible | Melts at lower temps |
| Water Resistance | Does not absorb | Absorbs water |
| Sound Blocking | Excellent | Good |
| Recycled Content | 70% | 20–30% |
Starting with proper preparation, tools, and materials, this guide walks you through installation, ensuring long-lasting performance and protection for your home.
Why and How We Install Continuous Exterior Rock Wool Insulation
Preparation for Installation
Getting your walls ready is the first and most important step for a successful mineral wool installation. A little effort upfront - checking surfaces, gathering tools, and installing protective barriers - can make all the difference in achieving effective, long-lasting insulation. Start by ensuring your wall surface is in the right condition.
Inspect and Prepare the Wall Surface
Before you begin, take a close look at your wall sheathing. It should be sturdy, dry, and free of contaminants like grease, dust, or bitumen residues. Walk around the exterior of your home and check for loose plaster or paint. Tap on the walls to find any weak spots, and remove problem areas as needed. If the surface has steam-tight coatings, strip them away to ensure proper adhesion.
If you see any signs of biological growth - like moss, algae, or fungi - clean these areas thoroughly with a steel brush and treat them with a fungicide solution to prevent them from coming back. For gaps or uneven surfaces greater than 3/4 inch (20 mm), fill them in with an appropriate filler or cement-cement-lime plaster. Also, check the strength of the substrate. Absorbent surfaces, such as old plaster, aerated concrete, or silicate blocks, may need a coat of primer to improve adhesion.
Lastly, pay attention to the weather. Aim to work when the humidity is below 80% and temperatures are between +41°F and +86°F (+5°C and +30°C). These conditions will help ensure everything adheres properly and performs as intended. A well-prepped wall is key to maximizing insulation performance.
Tools and Materials You'll Need
Having the right tools and materials on hand makes the installation process much smoother. Here’s what you’ll need:
- Tools: A serrated knife or insulation saw, tape measure, straight edge, screw gun (or drill), and possibly a staple gun for securing vapor barriers.
- Protective Gear: Work gloves, long-sleeved shirts, long pants, a cap, safety glasses, and a dust respirator to protect yourself from mineral wool fibers.
- Materials: Mineral wool insulation boards (such as ROCKWOOL Comfortboard® 80), fasteners with washers at least 2 inches in diameter, flashing tape, and a weather-resistant barrier (WRB). You’ll also want caulk, tape, or foam seals to close gaps and prevent thermal bridging and moisture intrusion.
When cutting the insulation, use a sharp serrated knife on a flat surface for clean, accurate cuts. Having everything ready before you start will save time and ensure a safer, more efficient process.
Install a Weather-Resistant Barrier (WRB)
Once your tools and materials are ready, the next step is installing a weather-resistant barrier (WRB). This step is crucial - not only does it meet building code requirements, but it also protects your home’s structure by limiting water intrusion. Focus on applying the WRB continuously, especially around windows and doors. Use the lapping (or shingling) method: install the top layer after the sides to channel water away from the wall.
Be sure to follow the manufacturer’s instructions for both the WRB and any windows or doors to ensure compatibility and maintain warranties. Proper flashing is a must - it guides any water that gets behind the cladding to a safe exit point. To complete the system, seal the interior air gaps around window and door openings to prevent moisture and air leaks. If you need to penetrate the WRB for fasteners or other attachments, consult the manufacturer’s guidelines to avoid compromising the barrier.
Taking the time to properly install a WRB ensures your insulation and siding work together to protect your home from moisture and improve energy efficiency.
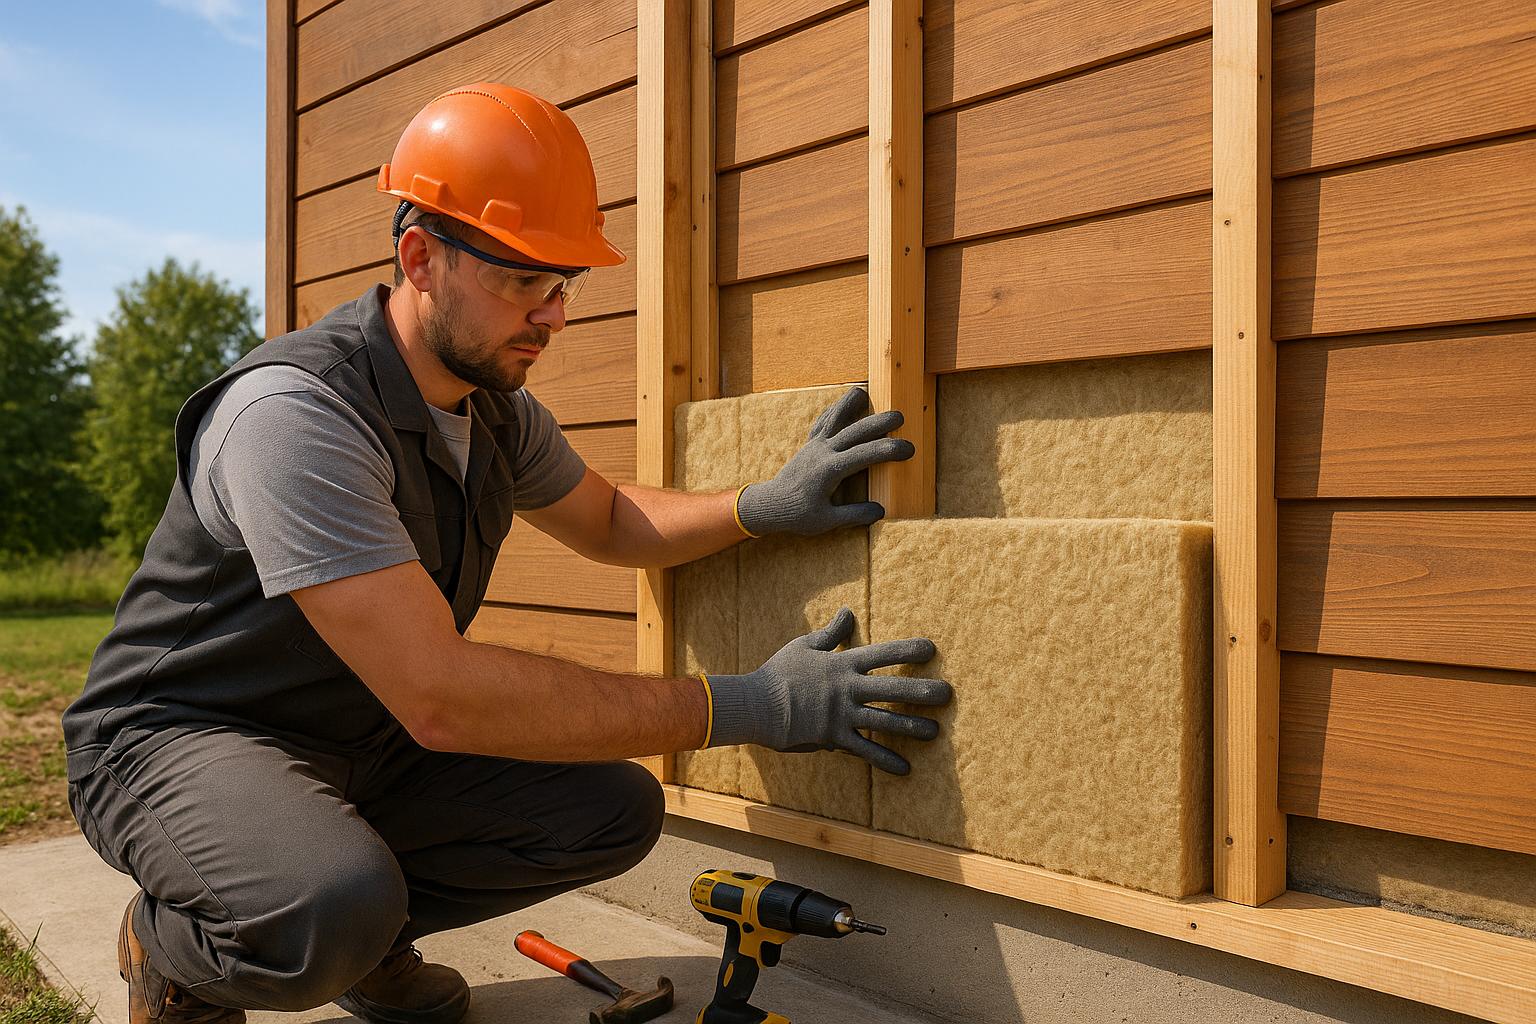
Installing Mineral Wool Insulation
With your wall surface prepped and the weather-resistant barrier in place, you're ready to install the mineral wool insulation. This step demands precision to ensure maximum thermal performance and energy efficiency.
Cut and Fit the Insulation
Cut the mineral wool slightly larger than the stud bay to ensure a snug, gap-free fit. For clean and precise cuts, use a stone wool knife or a serrated bread knife on a sturdy, flat surface . When dealing with obstacles like electrical boxes, pipes, or wiring, carefully cut around them to maintain seamless insulation coverage. For wires, make a slit where they intersect the insulation. For pipes, either create a reverse V cut or split the insulation to wrap it securely around the pipe.
Ensure the insulation extends to the exterior side of plumbing lines on exterior walls to help prevent freezing. Butt the edges tightly together to eliminate gaps . Once cut and fitted, secure the insulation in place to prepare for additional layers.
Fasten Insulation to the Wall
Use mechanical fasteners with at least 2-inch washers to secure the insulation, placing a minimum of five fasteners per board. Embed the fasteners 1.5 inches deep into wood or concrete. For steel stud construction, ensure the fasteners extend at least three full threads past the flange and use anti-unwinding fasteners for metal frames. Select fasteners that are suitable for the substrate and can handle the required pull-out and shear loads without damaging the insulation.
Avoid compressing the insulation during fastening, as this can reduce its thermal resistance. To maintain the insulation's full thickness, consider using blocking at fastening points for the furring strips. ROCKWOOL advises against using adhesives directly on the insulation for permanent attachment, though a construction-grade adhesive compatible with both the insulation and substrate can be used temporarily to hold pieces in place while fasteners are installed. Once secured, layer the insulation boards to create a continuous thermal barrier.
Layer and Align Insulation Boards
Install multiple layers of insulation with staggered seams to reduce thermal bypass. Align the vertical edges of the exterior insulation layer so they are fully covered by the furring strips. Minimize the number of fasteners to avoid thermal bridging, as excessive fastening can compress the insulation and reduce its effectiveness. Since the siding will eventually hold the insulation in place, over-fastening is unnecessary. Make sure the joints between layers are offset to create a continuous thermal barrier that blocks air infiltration .
sbb-itb-85e0110
Combining Siding and Insulation
After installing and layering your mineral wool insulation, the next step is to create a sturdy, moisture-resistant base for your siding. By building on your insulated wall system, you can ensure your siding is both secure and efficient.
Install Furring Strips for Siding Support
Furring strips are essential for providing a solid attachment point for siding while also creating necessary airspace behind the cladding. Attach the furring strips directly to the framing members instead of relying on the mineral wool for support. Including blocking with the furring strips helps stabilize the siding and creates a smooth wall surface.
"If you are going to vent your cladding make sure you have screens that prevent the entry of airborne embers/cinders." - Joseph Lstiburek
In most climates, a ventilated rainscreen is highly recommended when adding vertical wall cladding. This system usually needs a minimum 3/4-inch rainscreen cavity to function properly. The gap in the rainscreen allows moisture to drain away while promoting airflow to dry any water that gets through the wall assembly.
Depending on your siding material and local conditions, horizontal strapping may be a better option than vertical furring strips. Horizontal strapping can improve drainage and may suit specific siding types better. Always prioritize proper drainage and airflow behind the siding to prevent moisture buildup.
Flash and Seal Around Openings
Once the structural support is in place, the focus shifts to managing moisture. Properly flashing windows, doors, and other openings becomes trickier when working with mineral wool insulation. Directly attaching flashing to mineral wool can be problematic.
A practical solution is to install "picture-frame" strips of XPS foam around each window. This provides a smooth surface for sealing while maintaining the thermal barrier. This method ensures reliable flashing and helps manage moisture effectively.
"When moisture ends up on a layer as slick as housewrap, it does a logical thing: It slides down the wall. Once that moisture reaches the window, it easily finds its way into the rough opening through even the tiniest holes." - Rob Moody, Fine Homebuilding
For maximum protection, apply flashing in two layers: one at the drainage plane and another at the siding and trim layer. This dual-layer approach offers added defense against water infiltration. When using self-adhesive flashing strips, follow the sequence of bottom, sides, then top. Pay special attention to corners and ensure the upper flashing overlaps the lower pieces to direct water away from the home.
At the window head, run flashing tape over the jamb and extend it onto the window face by 1/8 to 1/4 inch. Then, install a metal cap flashing over the head-flashing tape for additional protection.
"The head jamb is the most-vulnerable part of the window, which is why these windows come with a drip cap that adds a layer of protection." - Fine Homebuilding
James Hardie Siding Compatibility

When combining siding materials with mineral wool insulation, specific details can greatly impact performance. James Hardie fiber cement siding, for example, pairs well with mineral wool systems, but proper installation is key to ensuring durability and meeting warranty requirements.
"James Hardie recommends installing HardiePanel on a capillary break (rainscreen/furring) as a best practice." - Martin Holladay, GBA Editor
If you're using James Hardie siding with a 1.5-inch layer of mineral wool insulation (such as Rockwool Comfortboard 80), 1.75-inch furring strips are required to accommodate the necessary 2-inch siding nails for secure attachment. Planning the wall assembly thickness early can help ensure the fastener and furring strip dimensions work seamlessly with the insulation.
For better holding power, opt for ring-shank nails instead of smooth-shank nails, especially when fastener penetration into the wood framing is limited to 3/4 inch. Ring-shank nails offer better resistance to withdrawal, which is critical when attaching through multiple layers of materials.
Predrill the cement board to avoid damaging it during installation, particularly when using longer fasteners needed for thicker wall assemblies. Always refer to James Hardie's installation guidelines and evaluation reports for the correct fastener types and placement, keeping local wind speeds and exposure in mind.
For these types of installations, professional expertise is invaluable. Companies like Bayshore Exteriors, which specialize in James Hardie siding, can ensure your project meets both manufacturer standards and local building codes.
Final Steps and Quality Check
With the installation complete, it's time to ensure everything is in perfect working order. A detailed quality check not only safeguards your investment but also ensures the insulation performs efficiently for years to come.
Safety Measures and Best Practices
When handling mineral wool, always prioritize safety. Wear gloves, long sleeves, eye protection, and a dust mask to avoid irritation from the fibers. Store any leftover material in a dry, moisture-free area to preserve its effectiveness.
For the final inspection, clean the workspace thoroughly. Check for dust and debris, as these can impact air quality. Use a HEPA-filter vacuum to remove any lingering particles and allow the area to air out, especially if you've been working in enclosed spaces. Shine a flashlight into corners and hidden spots to ensure no insulation scraps are left behind - small pieces can attract pests or affect air quality. Use a large magnet to pick up nails or other metal debris that might have fallen during the process. Once cleaned, reinstall any fixtures you removed earlier.
Check for Gaps and Compression
A proper inspection of the insulation placement is crucial. Poorly fitted batts or rolls can create gaps or compression, both of which reduce insulation efficiency. Gaps allow air to flow freely, while compression diminishes the material's R-value, which is essential for trapping heat.
Inspect the insulation to confirm it fits snugly without being compressed. If you spot any flattened areas, fluff them back to their original shape so the material can trap air effectively. Make sure each piece fits tightly against its neighbors, leaving no room for gaps. Use caulk or foam to seal visible spaces, especially in corners and around windows or doors.
Don't overlook outlets and light fixtures. These areas are prone to thermal bridging, which can compromise the insulation's performance. For hard-to-reach spots, use smaller insulation pieces or spray foam to ensure complete coverage. Seal any remaining gaps with caulk, weatherstripping, or expanding foam, particularly in areas where mineral wool can't fully seal. Pay close attention to air leaks around outlets, water spouts, and other openings.
Test Thermal and Moisture Performance
The last step is to confirm the insulation's thermal and moisture performance. Thermal imaging tools, like infrared thermometers or thermal cameras, can help identify potential weak spots. Scan your walls during extreme temperatures to spot hot or cold areas that might indicate insufficient coverage.
Check the physical integrity of the mineral wool by gently pressing on different sections. This ensures the insulation remains in place and hasn't shifted or settled. Mineral wool is designed to manage moisture effectively, as it is vapor permeable and resistant to water absorption. Even if it becomes saturated, it dries quickly and retains its properties once the water is gone. After any moisture exposure, confirm that the insulation has dried thoroughly and that your wall system is properly sealed to prevent water intrusion.
Finally, inspect for any signs of water damage, such as stains or discoloration, which could signal moisture issues. Address these immediately to prevent further problems. During the final walkthrough, ensure trims and edges are aligned and securely attached. This step helps maintain the insulation's performance and protects your siding system for years to come.
Conclusion
Using mineral wool under siding brings a host of long-term advantages. With a much higher R-value per inch compared to fiberglass, mineral wool delivers better thermal performance, which can lead to noticeable savings on energy bills. Its outstanding fire resistance also adds an extra layer of safety to your home’s exterior.
On top of its thermal and fire-resistant properties, mineral wool stands out as an environmentally friendly choice. It contains about 70% recycled content, compared to fiberglass, which typically has only 20–30%. Even more compelling is its environmental impact over time: for every ton of CO₂ emitted during production, around 200 tons are saved during its use.
"Mineral wool insulation provides a barrier to heat's natural tendency to flow to colder surfaces. Properly installed, it will cost-effectively reduce heating and cooling demand, increase overall energy efficiency, resulting in substantial energy savings and carbon emission reductions over the lifetime of buildings."
Durability is another area where mineral wool outshines alternatives like fiberglass or cellulose. It doesn’t settle or lose shape over time, ensuring consistent thermal performance for decades. This reliability means your home stays comfortable and energy-efficient year after year.
Beyond energy efficiency, mineral wool also enhances home comfort by reducing noise and resisting moisture, which helps prevent mold growth. This creates a quieter, healthier living environment.
Pairing mineral wool with high-quality siding, such as James Hardie, completes a high-performance exterior system. A well-designed furring strip system allows for proper drainage and ventilation behind the siding, protecting both the insulation and cladding from moisture-related issues.
FAQs
What makes mineral wool insulation a better choice than fiberglass for siding projects?
When it comes to insulation, mineral wool outshines fiberglass in several key ways. For starters, it delivers a higher R-value per inch, which translates to better thermal performance and improved energy efficiency. On top of that, its dense structure helps block sound, creating a quieter and more peaceful home environment.
Another standout feature of mineral wool is its non-combustible nature, offering top-tier fire resistance for enhanced safety. It’s also resistant to moisture, which helps prevent mold and mildew issues. Plus, since it’s often made from recycled materials, it’s a greener choice for those looking to reduce their environmental impact. These qualities make mineral wool a smart pick for boosting your home’s insulation and overall resilience.
How can I properly install a weather-resistant barrier (WRB) with mineral wool insulation under siding?
To install a weather-resistant barrier (WRB) with mineral wool insulation under siding, begin by selecting a vapor-permeable WRB. This type of barrier allows moisture to escape while blocking water from entering - a critical feature since mineral wool is also vapor permeable. Make sure the WRB is applied continuously over the sheathing, with seams and edges overlapping. Use proper fasteners and sealants to ensure no air or water can seep through.
Pay special attention to sealing any penetrations, such as around windows and doors, to keep the WRB intact and prevent moisture from getting in. Additionally, make sure the WRB and mineral wool insulation fit snugly together. This prevents gaps that could cause thermal bridging or lead to moisture problems. Always check and follow your local building codes for specific installation guidelines.
What safety precautions should I take when installing mineral wool insulation under siding?
When working with mineral wool insulation, keeping safety front and center is crucial to prevent irritation or injury. Make sure to use personal protective equipment (PPE), such as gloves to safeguard your hands, safety glasses to protect your eyes from dust, and a dust mask or respirator to avoid breathing in fibers. Wearing loose-fitting, long-sleeved clothing can also help shield your skin.
If fibers come into contact with your skin, resist the urge to rub them off. Instead, gently remove them with adhesive tape if needed, then wash the area thoroughly with soap and water. Should fibers enter your eyes, rinse them with water immediately rather than rubbing. Following these steps will help make the installation process safer and more comfortable.