Ultimate Guide to LED Deck Edge Lighting
Ultimate Guide to LED Deck Edge Lighting
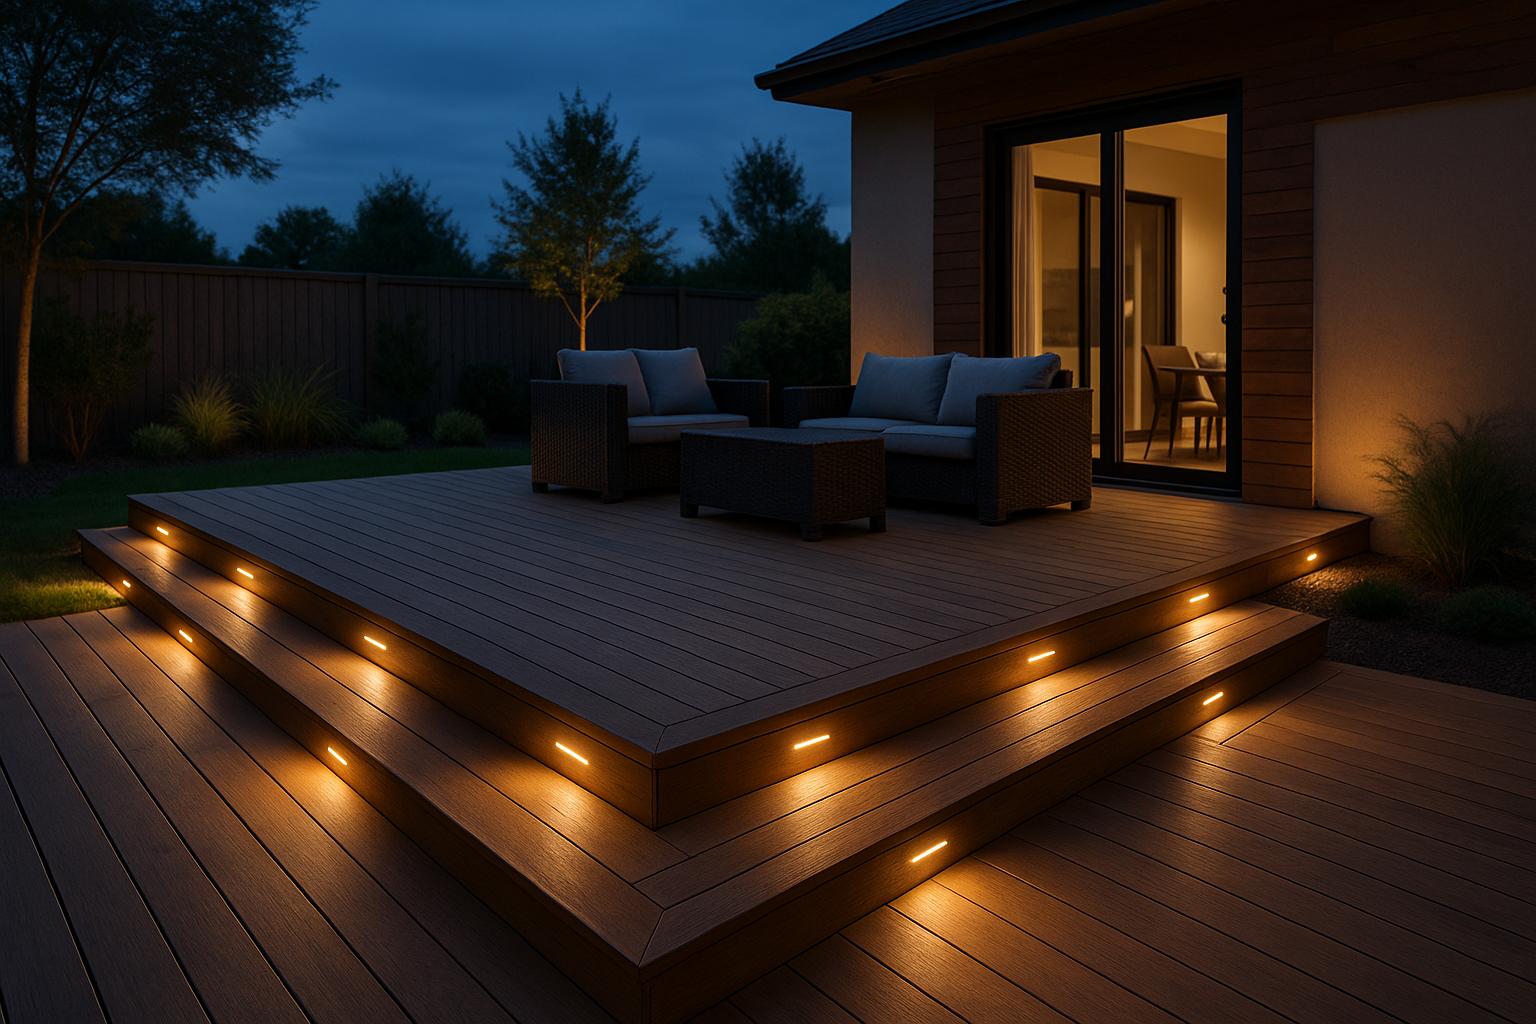
LED deck edge lighting is an excellent way to add safety, style, and functionality to your outdoor space. By outlining deck edges, stairs, and transitions with soft, low-voltage lighting, you can create a visually appealing and secure environment for nighttime use. Here’s what you need to know:
- What It Is: LED lighting installed along deck edges, often under fascia or railings, to illuminate horizontal surfaces.
- Benefits: Improves safety, reduces energy use (75% less than traditional bulbs), lasts thousands of hours, and enhances deck aesthetics with warm or color-changing light.
- Common Uses: Highlighting stairs, poolside borders, and waterfront decks; improving visibility and ambiance.
- Planning Tips: Measure your deck, locate a GFCI outlet, and choose fixtures that suit your deck's material and design.
- Installation Basics: Use a low-voltage transformer, weatherproof LED strips, and proper wiring techniques to ensure durability and compliance with safety standards.
- Maintenance: Clean fixtures regularly, check connections, and inspect for damage to keep your system running smoothly.
This guide covers everything from designing your lighting plan to troubleshooting common issues, ensuring your deck lighting is both functional and visually appealing.
Deck Lighting Ideas (full lighting install) with night shots
Planning Your LED Deck Edge Lighting Design
Before diving into your project, take the time to map out a solid lighting plan. This step ensures you’ll illuminate the right areas, avoid technical issues like voltage drop, and create a seamless look that complements your home’s exterior.
Evaluating Your Deck for Edge Lighting
Start by inspecting your deck to pinpoint areas that need lighting, such as stairs, level changes, and outer edges. Measure the perimeter and take note of obstacles like posts, railings, or built-in seating that may affect where you can place fixtures. If you spot any loose or rotted wood, make the necessary repairs before installation to ensure a secure setup.
Next, locate the nearest GFCI-protected outdoor outlet - this will be the starting point for your wiring. Sketch out a plan for your wiring path and fixture locations, beginning at this outlet. If your deck is made of composite material, make sure the fixtures you choose can accommodate deck expansion and contraction.
This evaluation sets the stage for making informed design choices.
Design Principles for LED Deck Lighting
Once you’ve assessed your deck, use these design principles to achieve the best results. When choosing a color temperature, consider the style of your home. For most U.S. homes, warm white (2,700–3,000K) works beautifully, giving wood or composite decks and traditional siding a cozy, inviting glow similar to incandescent lighting. If your home has a modern look - think gray composites, metal railings, or fiber-cement siding - neutral white (3,000–3,500K) offers a clean, crisp appearance without leaning too blue. Warm tones like tans, browns, and reddish stains pair well with warm white, while cool grays and blacks look sharper with neutral white. Save RGB or color-changing lights for accent areas or special events, and stick to a consistent white tone for safety and wayfinding along edges and stairs.
Position fixtures evenly to avoid dark spots, and aim the lights downward or outward to reduce glare on the deck surface. Opt for a system with a dimmer or adjustable brightness settings so you can adjust the lighting for gatherings or late-night relaxation.
Once your design is finalized, shift your focus to power requirements and code compliance.
Power and Code Requirements
To power your lighting, calculate the total wattage needed. List each fixture type, note its power draw, and multiply by the number of fixtures. For example, if you have twenty 1W puck lights and ten 3W stair lights, your total wattage is 50W. Choose a 12V outdoor-rated transformer with 20–30% extra capacity - a 75–100W transformer is ideal for a 50W load, leaving room for future additions and preventing the system from running at full capacity. For larger setups or split layouts, consider using multiple transformers to feed separate low-voltage runs, which helps avoid voltage drop and keeps light levels consistent across the deck.
Make sure your transformer is rated for wet or damp locations and works with your control method, whether that’s a timer, photocell, or smart controller. Install it close to a GFCI outlet and, if using a timer, mount it vertically at least 1 foot off the ground to meet U.S. outdoor electrical safety standards. Most low-voltage (12V) systems don’t require a licensed electrician, but it’s always a good idea to check your local building codes and permitting rules before starting. Run wiring under the decking and along joists, leaving some slack for adjustments. Use splitters at post bases instead of splicing wires.
| Power Planning Element | Recommendation | Key Consideration |
|---|---|---|
| Transformer Size | 20–30% above total wattage | Allows room for future additions |
| Wiring Runs | Under joists, hidden | Leave slack for adjustments; use splitters instead of splicing |
| Outlet & Timer | GFCI-protected; timer mounted vertically, 1 ft+ off ground | Meets outdoor safety standards |
Choosing the Right LED Lighting Components
With your design and power plan in place, the next step is selecting lighting products that match your deck's material and the atmosphere you want to create.
Types of LED Strips and Fixtures
To start, look for weatherproof LED strips with a rating of IP65 or higher. This ensures they can handle rain, dust, and UV exposure - common challenges for outdoor decks. For consistent edge lighting, single-color warm or neutral white strips are a solid choice. If you're looking to add some versatility for events or holidays, RGB/RGBW color-changing strips let you switch up colors and moods using apps or controllers. The RGBW option even includes a dedicated white channel, providing clean white light for everyday use alongside vibrant color effects when you need them.
For a sleeker, more subtle look, consider recessed edge markers like low-profile puck lights or flush-mount fixtures. Trex LED deck lights offer weatherproof, dimmable options for post caps, rails, and recessed areas. They also come with wire splitters, making it easy to expand your system without having to splice wires. If you're lighting up railings, DesignRail LED strips are a great option. These snap into subrail channels with adhesive backing and translucent covers, creating smooth, diffused lighting along the rail edge.
| Type | Best For | Key Feature |
|---|---|---|
| Weatherproof LED Strips | Continuous edge runs | IP65+ rating, flexible installation |
| RGB/RGBW Strips | Entertaining, customizable ambiance | Color-changing via app, includes white channel |
| Recessed Edge Markers | Subtle, flush-mount look | Low-profile puck or flush fixtures |
| Rail System Strips | Integrated railing lighting | Snap-in channels with diffuse covers |
Once you've chosen your lighting, the next step is to focus on proper mounting to ensure durability and a polished look.
Mounting and Installation Accessories
How you mount your LED strips plays a big role in both their appearance and lifespan. Aluminum channels are a top choice for wood or composite decks. They protect the strips, help dissipate heat, and come with diffusers to spread light evenly. For smooth surfaces, adhesive backing (like 3M VHB tape) offers a straightforward installation, though porous wood may need a primer for better adhesion. For railing systems, clip-in tracks simplify the process - DesignRail subrails, for example, let you snap strips into place without tools.
When running wires under the deck, use cable-safe staples to secure them along joists. Be sure to leave extra slack to accommodate seasonal movement and avoid pinching.
Once your LED strips are securely mounted, it’s time to enhance your setup with control and power accessories.
Control and Power Accessories
Control options let you tailor your lighting to your needs. Low-voltage dimmers, compatible with your transformer, are great for dry areas within 30 feet of the power supply. Timers can automate your lighting schedule - just make sure they’re mounted vertically, with the receptacle facing down, and at least 1 foot off the ground to meet U.S. outdoor electrical codes. For RGB systems, smart controllers allow you to adjust colors and set schedules through Wi-Fi apps.
To ensure a reliable setup, use outdoor-rated connectors for all wire joins. Trex systems, for example, include wire splitters that simplify adding lights and keep your installation neat and easy to upgrade in the future.
sbb-itb-85e0110
Step-by-Step Installation Process

LED Deck Edge Lighting Installation Process: 3-Phase Guide
The installation process is divided into three main phases: preparation, installation, and testing.
Preparing for Installation
Before you begin, ensure you have access to a GFCI-protected outdoor outlet near your deck to plug in the transformer. The outlet should meet U.S. safety standards: it must be mounted vertically, with the receptacle facing downward, and positioned at least 12 inches above the ground. Create a scaled layout of your deck, marking the precise locations for edge lights, the transformer, junction points, and any controllers or timers.
Measure the perimeter of your deck in feet and inches, then calculate the total wattage of all fixtures you plan to install. Choose a transformer rated 20–30% higher than your total wattage - for instance, a 60-watt system requires at least a 75-watt transformer. Gather the necessary tools, such as a drill, wire strippers, screwdrivers, cable clamps, silicone sealant, and safety gear. Ensure you have all required materials, including LED strips, fixtures, mounting channels, outdoor-rated wire connectors, and low-voltage landscape cable (typically 12–16 gauge, UL-listed).
Prepare surfaces where adhesive-backed strips will be mounted, such as deck fascia, railings, or aluminum channels, by cleaning them thoroughly. Dry-fit your channels or diffusers to confirm alignment before securing them permanently.
With your layout and tools ready, you’re set to move on to installing the LED components.
Installing LED Lighting Components
Use your layout as a reference to verify fixture placement during installation. For recessed edge or puck lights, drill holes of the correct size, thread the fixture leads, and secure the housing firmly. Avoid forcing fixtures into composite decking during hot weather, as the material may shrink in cooler conditions. For strip lights in railing systems like Feeney DesignRail, snap the LED strips into the subrail track, peel off the adhesive backing gradually, and press the strip firmly into place. Be mindful of the strip’s minimum bend radius and avoid stretching it.
Route all cables beneath the deck structure, securing them to joists and beams with insulated staples or cable clamps spaced every 12–18 inches. Do not run wires between deck boards and joists, as movement could pinch or damage the insulation. Use wire splitters at posts or junction points to branch off to multiple lights. Systems like Trex LightHub offer plug-and-play connections, which simplify this step. Mount splitters in accessible, protected spots, leaving some slack at each junction for easier maintenance. Use outdoor-rated, gel-filled, or heat-shrink connectors to make all connections, ensuring correct polarity. Seal any deck penetrations exposed to the elements with silicone sealant to prevent water damage.
Testing and Final Adjustments
Once the components are installed, it’s time to test the system. Begin by testing the first run to ensure consistent illumination without flickering. Add additional runs one at a time to quickly identify any issues.
Walk around the deck at night to spot any dark areas, overly bright spots, or misaligned fixtures, and make adjustments as needed. Test dimmers, timers, and smart controls by cycling through brightness settings and schedules. Keep in mind that controls should typically remain within 30 feet of the power supply for reliable performance. If a segment isn’t lighting up, check to ensure the transformer isn’t overloaded and that all connectors are properly seated with the correct polarity. Flickering or dim sections far from the transformer may indicate voltage drop; you can address this by splitting the load into shorter runs, using heavier-gauge wire, or adding another transformer.
Finally, label each run at the transformer and key junction points to make future troubleshooting easier.
For any uncertainties about the installation process or compliance with local electrical codes, consider consulting a licensed electrician or contacting Bayshore Exteriors for expert assistance.
Maintaining and Troubleshooting LED Deck Lighting
Routine Maintenance Tips
With proper care, LED deck lights can last up to 50,000 hours. However, issues like moisture, heat buildup, and loose connections can shorten their lifespan. To keep your lighting in top shape, inspect the system twice a year and after storms. Look for cracked lenses, loose fixtures, frayed wires, or corroded connectors. Clean the lenses and housings using a soft cloth and mild soap solution, avoiding harsh chemicals or abrasive pads that might damage plastic or sealants. Clear away leaves, dirt, and other debris from fixtures and junction points to prevent moisture buildup and overheating.
If your lights suddenly stop working, check the GFCI outlets connected to your transformer. Reset the GFCI if needed and test the system again. Annually, tighten low-voltage terminals and reconnect any plug-and-play connectors. Make sure the area around your deck has proper drainage to prevent standing water, especially near posts where junction boxes and transformers are often installed. In colder climates, inspect your system in early spring to address any freeze-thaw damage. For coastal or humid regions, check more frequently for signs of corrosion around metal parts.
If routine maintenance doesn’t solve the problem, follow the troubleshooting steps outlined below to identify and fix specific issues.
Troubleshooting Common Issues
Troubleshooting is essential to keeping your LED deck lights functioning efficiently. If all lights are out, start by checking that the GFCI outlet and circuit breaker are active. Confirm that the transformer is plugged in, its built-in breaker or fuse is intact, and the photo-eye or timer is set correctly. Temporarily bypass the timer or photocell to see if they’re causing the issue. For a single non-working zone, test the first failed light with a multimeter and inspect the connectors. If one fixture is dim or not working, replace it with a known working fixture. If the problem persists, inspect the wiring for damage, especially where it passes through framing.
Flickering lights can indicate that the total wattage exceeds 80–90% of the transformer’s capacity, the wire gauge is too small for the distance, or connectors are loose or corroded. If you notice moisture inside a lens, disconnect the power, remove the light, dry it thoroughly, and reseal it with new gaskets or a thin bead of exterior-grade silicone. For LED strips, cut back to a dry section and install a new waterproof end cap using silicone and heat-shrink tubing, ensuring correct polarity. If part of a strip fails, cut out the damaged section and reconnect the ends using weatherproof connectors or soldering, then reseal.
Planning for Upgrades
Once your LED system is maintained and functioning properly, you can think about upgrades to improve performance or meet future needs. If you’re adding more deck-edge lights, calculate the total load on your transformer. If the new fixtures exceed its capacity, you’ll need to add a second transformer and circuit. Upgrading to smart transformers or controllers is another option - they allow for scheduling, dimming, and remote control. Just make sure the new unit is rated for outdoor use and installed in a protected location. Many modern systems use standard 12V low-voltage wiring, making it easy to replace older halogen fixtures with LEDs while keeping the existing cabling and transformer (if it has enough capacity).
If you’re remodeling your deck or exterior - like adding new railings, siding, or deck boards - coordinate lighting upgrades with the project. This way, wiring and transformers can be routed behind new siding, inside posts, or hidden in access panels. When larger exterior renovations, such as re-siding or full facade updates, are planned, working with professionals like Bayshore Exteriors ensures that lighting cables, junctions, and mounting details integrate seamlessly into the new design. These strategies not only enhance the functionality of your deck lighting but also ensure it remains safe and visually appealing for years to come.
Conclusion
LED deck edge lighting is more than just a practical upgrade - it’s a way to enhance your outdoor space with added safety, style, and lasting value. By carefully planning your layout, understanding your power requirements, and choosing durable, low-voltage, weather-resistant components, you can create a lighting system that not only highlights deck borders, stairs, and transitions but also reduces the risk of trips and falls for your family and guests. The result? A beautifully lit outdoor area that feels like a resort and showcases the unique features of your deck.
With regular upkeep and simple troubleshooting, your LED lighting system can provide reliable performance for years to come. Most maintenance tasks are easy to handle, and routine checks help ensure everything runs smoothly. Plus, if you’re tackling a larger exterior renovation, incorporating LED lighting into the project can tie everything together, boosting your home’s curb appeal and even its resale value.
For those considering a full-scale renovation, teaming up with professionals like Bayshore Exteriors can make all the difference. They specialize in integrating lighting with other exterior upgrades, such as James Hardie siding and custom trim, ensuring a cohesive and polished look. Their expertise in planning and installation helps create an outdoor space that’s not only functional but also a true asset to your home for years to come.
FAQs
What’s the best LED color temperature for my deck lighting?
The ideal LED color temperature for your deck lighting hinges on the mood you want to set. For a cozy, welcoming ambiance, stick to 2700K to 3000K. If you’re after a clean, neutral brightness, aim for 3500K to 4100K. Want something crisp and energizing, like natural daylight? Then 5000K to 6500K is the way to go. Consider your deck’s style and how you plan to use the area to pick the best option.
How can I properly maintain LED deck edge lighting?
To keep your LED deck edge lighting working perfectly, give it regular attention. Use a soft, damp cloth to gently wipe away dirt and debris. Every so often, inspect the connections and waterproof seals to make sure they're secure and free from moisture. Steer clear of harsh chemicals - they can damage the LEDs or wiring.
Keep the power supply and control systems in a dry, well-ventilated spot to avoid unnecessary wear. If you spot any dim or damaged LEDs, replace them right away to maintain a consistent glow. With a little care, your LED deck edge lighting can stay both functional and stylish for years.
How do I avoid voltage drop in my LED deck edge lighting setup?
To keep your LED deck edge lighting shining bright without any voltage drop, start by using thicker gauge wires. Thicker wires reduce resistance, ensuring a steady flow of power. Also, aim to keep your wiring runs as short as you can - longer wires mean more resistance and potential dimming.
Make sure your power supply is up to the task. It needs enough capacity to handle the total wattage of your lighting system. If you’re working with a larger setup, you might want to add a secondary power source or incorporate relays. This helps distribute power evenly, so every light gets the energy it needs.
With some careful planning and reliable components, your deck lighting can stay consistently bright and perform flawlessly.