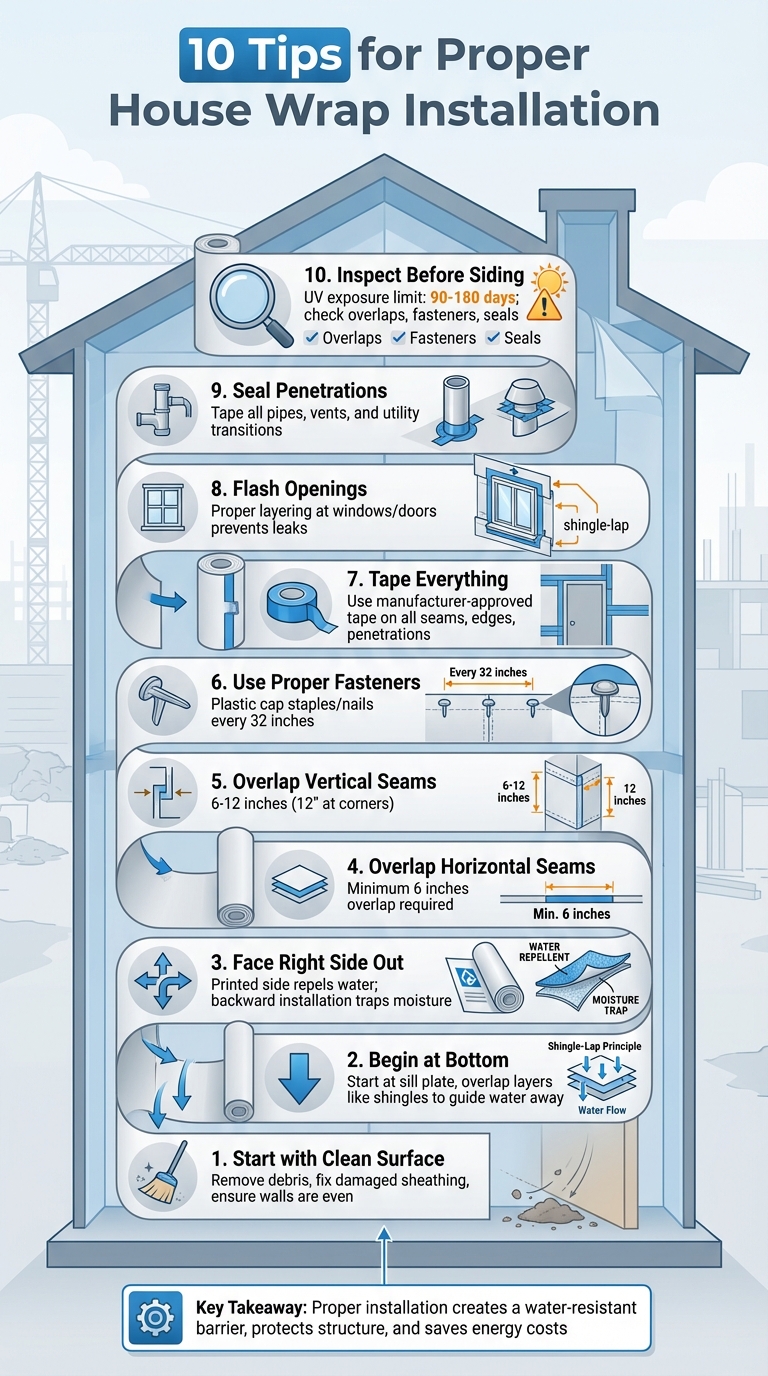
10 Tips for Proper House Wrap Installation
10 Tips for Proper House Wrap Installation
House wrap installation mistakes can cost you thousands in repairs and energy loss. Here's what you need to know to get it right:
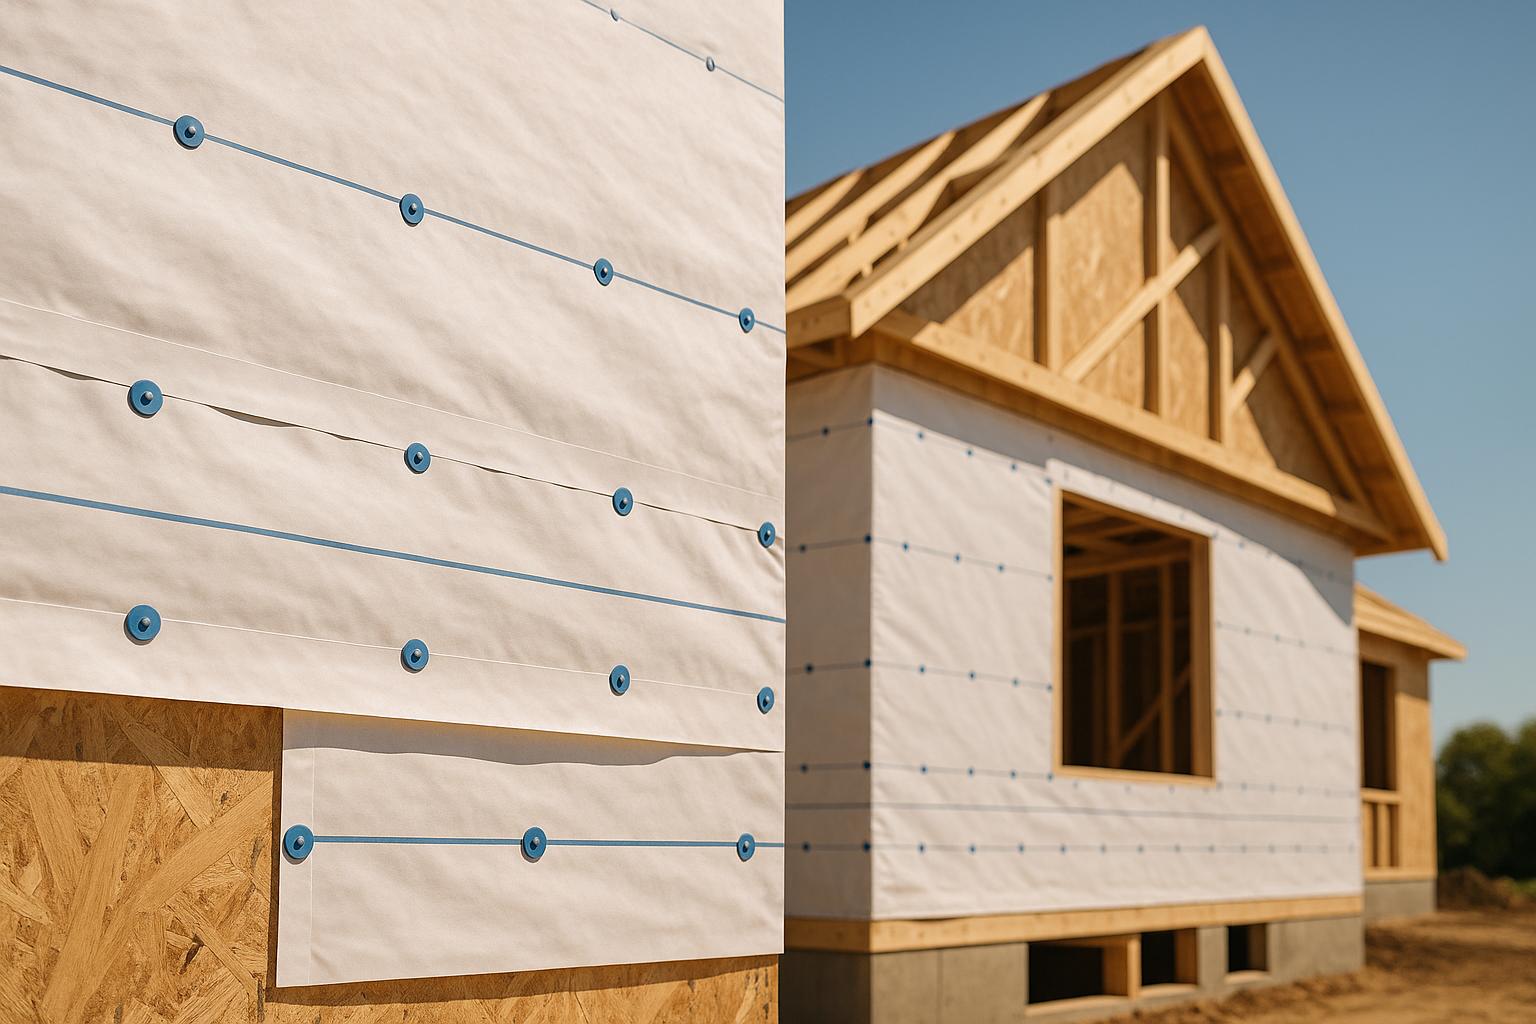
- Start with a clean, dry surface: Remove debris, fix damaged sheathing, and ensure walls are even.
- Begin at the bottom: Overlap layers like shingles to guide water away from the wall.
- Face the right side out: The printed side repels water; installing it backward traps moisture.
- Overlap seams properly: Horizontal seams need at least 6 inches; vertical seams, 6–12 inches.
- Use the right fasteners: Plastic cap staples or nails prevent tearing and ensure durability.
- Tape all seams and edges: Use manufacturer-approved tape to seal gaps and maintain warranties.
- Flash windows and doors correctly: Proper layering prevents leaks and protects openings.
- Seal utility penetrations: Pipes, vents, and transitions need careful taping to block water.
- Limit UV exposure: House wrap degrades after 90–180 days in sunlight - inspect before siding.
- Inspect before siding: Ensure overlaps, fasteners, and seals are intact to avoid hidden issues.
Key takeaway: Proper installation ensures a water-resistant barrier, protects your home's structure, and saves on energy costs. Follow these steps or consult professionals for complex projects.
10 Essential Steps for Proper House Wrap Installation
How to Install Tyvek House Wrap | Full Walkthrough with Windows, Doors & Gables
1. Prepare a Clean and Even Wall Surface
Before you start unrolling your house wrap, take a moment to inspect the wall sheathing. Dirt, sawdust, mud, or other construction debris can prevent the wrap from lying flat and interfere with the adhesion of flashing tapes. Many pros emphasize that surface preparation is often overlooked, yet it’s a key factor in whether your moisture barrier lasts for decades or fails prematurely.
Walk along the wall and remove any protruding fasteners that could puncture the wrap and compromise its integrity. Use a hammer to drive nails flush, pull out bent fasteners with pliers, and sweep or vacuum away loose particles. If you notice damaged or loose sheathing panels, replace or refasten them immediately. Wrapping over warped or rotting boards can create gaps where moisture might accumulate.
Check for flatness by running a straightedge over 4–6 ft sections of the wall. Bulges, dips, or uneven seams between panels can prevent the wrap from fitting tightly, leading to sagging areas that trap water instead of shedding it. Shim low spots and plane down high areas to create a smooth surface. This step is especially critical around windows, doors, and other openings, where flashing tapes need a proper seal. Make sure the surface is completely dry before moving forward to avoid adhesion problems.
Always apply house wrap to dry sheathing. Avoid installing it over wet, muddy, or icy surfaces. If recent rain has soaked the OSB or plywood, wait at least 24 hours to let it fully dry. Finally, run your gloved hand over the wall to feel for bumps or sharp edges that could tear the wrap once it’s tensioned.
For homeowners, hiring professionals like Bayshore Exteriors can ensure proper sheathing repair and meticulous surface preparation before installation. This attention to detail helps reduce the chances of moisture problems and energy loss down the line.
2. Start Installation at the Sill Plate or Bottom of the Wall
When starting on a clean wall surface, it’s best to begin wrapping at the very base of the wall, right at the sill plate. This method is widely recommended because it allows each upper layer of the wrap to overlap the one beneath it, creating a shingle-like effect.
Make sure the bottom edge of the wrap extends 2–4 inches below the sill plate. This ensures water drains onto the flashing or foundation ledge, keeping it from sneaking behind the sheathing. This small detail is essential for creating a continuous lower drip edge that directs water outward, protecting the wall cavity from potential moisture issues.
Always work from the bottom upward. This way, each layer overlaps the one below, letting gravity help guide water away from the wall. Starting higher and working downward reverses the overlaps, which can inadvertently channel water into the wall assembly - a mistake you definitely want to avoid.
Be sure to align the wrap with the sill flashing to maintain a seamless drip edge. The wrap should overlap the sill or foundation flashing by at least 2 inches. This setup ensures that any water behind the siding first encounters the wrap, then the flashing, and finally exits at the exterior face of the foundation. This alignment is especially important for maintaining long-term protection in areas with complex transitions.
If your project involves intricate base-of-wall details or mixed cladding systems, consider consulting professionals like Bayshore Exteriors. They have the expertise to ensure the wrap, flashing, and siding - whether it’s James Hardie or another material - are correctly integrated for effective drainage that stands the test of time.
3. Install House Wrap with the Correct Side Facing Out
Once the wall is prepped and you've started at the sill, the next step is making sure the house wrap is oriented correctly. Most house wraps have markings or text on the exterior-facing side. This printed side is designed to repel water while still allowing vapor to escape.
Installing the wrap incorrectly - flipping it so the wrong side faces out - can cause major moisture issues. When reversed, the material can't shed water as intended, trapping vapor against the sheathing. This trapped moisture can lead to mold, wood rot, and even structural damage. In regions with heavy rainfall, like the Southeast, studies show that installing house wrap backward can increase the risk of water infiltration by 20–50%.
To avoid this, always confirm the wrap's orientation before securing it. Start at a corner and tack only the top corner first, with the printed side facing out, to double-check its placement. If there's any doubt, consult the product guide or look for text that says "this side out." Typically, the unprinted or textured side should face the wall sheathing. A quick test can also help: sprinkle water on the material and see which side repels droplets immediately. Some pros suggest unrolling about 10 feet of wrap to ensure the printed side is visible before fully securing it.
For added peace of mind, working with experienced contractors like Bayshore Exteriors can ensure the wrap integrates seamlessly with your siding, offering reliable moisture protection. Proper orientation is just as important as prepping the surface when it comes to preventing long-term moisture problems.
4. Overlap Horizontal Seams by at Least 6 Inches
Once you've got the orientation right, the next step is ensuring that horizontal seams overlap properly. To keep water from sneaking behind the house wrap, most manufacturers recommend a minimum 6-inch overlap between horizontal seams. This overlap, when paired with proper preparation and alignment, plays a key role in keeping moisture out.
The idea here is simple: the shingle-lap method. Each upper layer should overlap the one below it, guiding water downward and away from the structure. If the overlap is too small - say, only 2 to 3 inches - issues like wind-driven rain, capillary action, or even slight structural shifts can let water sneak in. This can lead to serious problems like rot or mold. In areas with harsher conditions, such as coastal regions or taller structures, professionals often go beyond the standard and opt for an 8- to 12-inch overlap for added protection.
To make sure you're keeping things consistent, snap a chalk line 6 inches above the previous course and use it as a guide for aligning the next layer. Check periodically to ensure the overlap remains even. Keep the wrap snug, but don’t stretch it too tightly - overstretching can cause the overlap to shrink over time.
While taping the seams can help, it’s not a substitute for the required 6-inch overlap, which is critical for meeting system warranties. Before moving on to siding installation, take the time to inspect all seams to confirm they’re properly overlapped and aligned.
5. Overlap Vertical Seams by 6-12 Inches
Pay as much attention to vertical seams as you do to horizontal ones. The general rule is to overlap vertical seams by 6 to 12 inches, depending on where you're working on the wall. For the flat, open areas of your walls, a 6-inch overlap usually does the trick. However, when dealing with corners - whether inside or outside - step it up to 12 inches to ensure complete coverage and protection. This extra care helps seal out gaps and keeps the moisture barrier intact.
A proper vertical overlap channels water downward, away from the structure. Skimping on this - say, overlapping by only 3 or 4 inches - can create weak spots where wind-driven rain might sneak in. Over time, this could lead to moisture buildup, rot in the sheathing, and even voided warranties. In areas prone to high winds, inadequate overlaps have been known to cause premature failures as water seeps through those unsealed joints.
Always check the manufacturer's guidelines. For instance, DuPont Tyvek recommends 6-12 inches for vertical seams, while PermaR specifies 6 inches in open wall areas but requires 12 inches at corners. Following these instructions not only ensures proper performance but also keeps your warranty intact.
When installing, start at a corner of the building with the printed side of the wrap facing outward, leaving a 12-inch flap to wrap around. As you continue along the wall, unroll the next sheet so it overlaps the previous one by at least 6 inches. Make sure the wrap is snug but not stretched. Secure it with plastic cap staples every 32 inches, and finish by taping the seam with tape approved by the manufacturer. This combination of overlap and taping creates a strong, reliable seal to protect your wall.
sbb-itb-85e0110
6. Use Plastic Cap Staples or Nails for Fastening
When it comes to securing house wrap, plastic cap staples or nails are the go-to choice for long-lasting performance. The plastic cap provides a broader surface area, which helps distribute pressure more evenly across the wrap. This minimizes the risk of punctures or tears, unlike standard staples that can damage the material and compromise its resistance to wind uplift.
For wood-based sheathing, such as 7/16-inch OSB or 15/32-inch plywood, aim to fasten the wrap every 32 inches both vertically and horizontally. In areas prone to stronger winds, contractors often tighten the spacing to 12 to 18 inches horizontally and 24 inches vertically for added security. Be sure to fasten the wrap firmly, but without over-puncturing it.
Start at the top by securing the first row about 1 inch below the top edge of the wrap. This allows for slight adjustments during installation. Begin by tacking the corners and center, then pull the wrap taut before driving in the rest of the fasteners. Make sure the fasteners sit flush with the surface - overdriving can cause tears, while underdriving leaves the wrap loose and vulnerable to wind damage. These placement techniques work hand-in-hand with the proper overlaps mentioned earlier.
For non-wood substrates, such as steel framing, screws with washers are the better option. If you're working with open studs or non-structural sheathing, fasten the wrap 1 to 2 inches deep. Some manufacturers, like Benjamin Obdyke, even mandate the use of cap fasteners to maintain their system warranties, as these fasteners significantly reduce the risks associated with improper installation.
7. Tape All Seams, Edges, and Penetrations Thoroughly
Once the house wrap is securely fastened, the next step is crucial: taping. This process ensures your moisture barrier is complete and effective.
House wrap alone won't fully safeguard your walls. Taping seals the seams, edges, and wall penetrations to block water and air. Pay special attention to horizontal and vertical seams where two pieces of wrap overlap. These areas, along with corners, edges (like where the wrap ends at the foundation or roofline), and any penetrations - such as windows, doors, hose bibs, electrical boxes, vent pipes, and HVAC lines - should be taped completely to ensure a proper seal.
Choosing the right tape is just as important as applying it. Compatible tapes are specifically designed by the house wrap manufacturer to bond with the material, such as spun-bonded polyolefin. These tapes often use acrylic or butyl-based adhesives, which are resistant to UV exposure, temperature changes, and moisture over time. On the other hand, generic tapes, like duct or masking tape, may stick at first but quickly lose adhesion, curling and failing. In fact, many manufacturers require their approved tape to maintain the warranty.
| Tape Type | Durability | Warranty Impact |
|---|---|---|
| Compatible (WRB-specific) | UV- and weather-resistant; long-lasting bond | Required for full system warranty |
| Incompatible (generic) | Adhesive fails within months or seasons | May void or limit manufacturer warranty |
Once you've selected the appropriate tape, apply it correctly. Start by ensuring the house wrap is clean, dry, and smooth. Place the tape with 1–2 inches of coverage on either side of the seam, and press it down firmly using a hand roller. Always follow the shingle principle: begin with lower layers and overlap with upper ones to direct water outward. Also, check that the temperature aligns with the tape's application requirements. This step, combined with proper fastening and overlapping, completes your home's moisture defense.
If you're tackling a larger exterior project, consider working with experienced professionals like Bayshore Exteriors. They ensure that every component - from house wrap to taping and siding systems (including James Hardie products) - is seamlessly integrated into a durable and effective building envelope.
8. Flash Windows, Doors, and Openings Properly
Windows and doors are often the weakest links in your building’s outer shell. Small gaps around fasteners and joints can allow wind-driven rain to sneak behind your siding and house wrap. Even a minor mistake in flashing - like a poorly installed window sill - can lead to persistent leaks. Over time, this can rot the framing, encourage mold growth in insulation, and damage interior finishes, sometimes far from the original entry point of the water.
Once your fastening and taping techniques are solid, the next step is to focus on safeguarding these vulnerable openings. A proper shingled flashing sequence ensures water is directed outward at every layer:
- Sill flashing tape: Apply this across the bottom of the opening, extending 6 inches up each side jamb to create a drainage pan.
- Window installation: Follow the manufacturer's instructions, bedding the sides and top in sealant but leaving the sill open for drainage.
- Side jamb flashing tape: Place this over the sill tape, overlapping onto the house wrap.
- Head flashing tape: Apply this over the side tape and tuck it under the upper flap of the house wrap.
This method ensures water flows away from the openings efficiently. Water hitting the house wrap moves down onto the head flashing, then onto the side flashing, and ultimately drains out over the sill pan. This prevents water from sneaking behind the wall. The same principles apply to doors and larger openings, though door sills often require extra attention due to their proximity to the ground, where splashback, snow, and foot traffic can increase moisture exposure.
Some common mistakes to watch out for include cutting the house wrap too large and discarding the excess, reversing the proper shingling order, sealing the bottom flange (which blocks drainage), and using tapes that don’t bond well. To avoid these issues, inspect each opening to ensure proper drainage before installing siding. These flashing details work hand-in-hand with the moisture barrier system you’ve already established.
For projects requiring extra care - like multi-story buildings, coastal homes, or full exterior remodels - companies like Bayshore Exteriors apply these detailed flashing techniques. This approach ensures a tight, durable building envelope that integrates house wrap, flashing, windows, and siding, including products like James Hardie siding.
9. Seal All Utility Penetrations and Transitions
Every pipe, vent, electrical box, and outdoor faucet that penetrates your wall is a potential weak spot for water intrusion. These utility penetrations often go unnoticed but can lead to serious issues if not properly sealed. Even a small gap around a plumbing pipe or dryer vent can allow wind-driven rain to sneak past your weather barrier, potentially causing moisture damage inside your walls.
Treat each penetration like a small flashing project. Start by cutting the house wrap above the penetration to create flaps that can be folded back. Then, apply flashing tape over these flaps to guide water downward. Be sure to press the tape firmly to remove any air pockets. This careful taping not only seals the penetration effectively but also helps you meet warranty requirements.
Skipping this step can be risky. Research shows that failing to seal penetrations can increase the likelihood of leaks by up to 50% during wind-driven rain events. Proper taping is essential to protect your home and maintain warranty coverage.
For transitions between wall sections, follow the same principles. Extend the house wrap 2–4 inches beyond the foundation and tape the overlap securely. At corners, overlap by at least 12 inches and tape all edges to ensure a continuous barrier. Always use tapes approved by the manufacturer to avoid compatibility issues.
Some common mistakes to avoid include using overlaps that are too short, applying tapes that may peel off over time, or forgetting to use plastic-capped fasteners around penetrations to prevent tearing. Coastal installations, in particular, highlight the importance of sealing. Unsealed dryer vents in these areas have led to moisture intrusion and siding rot within just two years. Fixing these issues later can double labor costs. Before moving to siding installation, inspect each sealed penetration by tug-testing the tape and checking for any gaps.
Here’s a quick reference table to guide you on sealing different types of penetrations:
| Penetration Type | Sealing Approach | Materials Needed |
|---|---|---|
| Pipes & Plumbing Vents | Cut flaps, tape along sides and top | Flashing tape, roller |
| Dryer Vents & Electrical Boxes | Peel back wrap, tape around perimeter | Seam tape (manufacturer-recommended), plastic-capped fasteners |
| Corners & Wall Transitions | Overlap by at least 12 inches, tape all edges | Sheathing tape (e.g., Tyvek tape) |
10. Limit UV Exposure and Inspect Before Siding
House wrap isn’t built to withstand prolonged UV exposure. Most products are rated for only 90–180 days before sunlight starts to break them down, potentially voiding warranties and reducing their effectiveness. For instance, DuPont Tyvek allows up to 120 days of UV exposure for many of its residential wraps. If your project gets delayed, you’ll need to shield the wrap with opaque tarps or temporary sheathing that’s securely fastened to withstand wind. During inspections, watch for telltale signs of UV damage - things like chalking, yellowing, brittleness, or cracking. If the wrap feels brittle, crumbles when bent, or shows surface cracks, it’s no longer safe to use and should be replaced.
Before siding goes up, this is your last opportunity to identify and fix any issues that will be hidden once the cladding is installed. Walk the entire perimeter of your home, starting at the bottom and working your way up, to ensure everything is in good shape. Pay special attention to overlaps, taped seams, and fasteners to confirm they haven’t been compromised by UV exposure. Check around every window, door, and opening to make sure shingled flashing is properly installed. For utility penetrations like pipes, vents, or electrical boxes, confirm they’re sealed with compatible tape - not just caulk. Give taped edges a gentle tug to ensure they’re firmly adhered and aren’t peeling away.
Make sure to log the installation date of the house wrap so you can track how long it’s been exposed to UV rays and ensure siding is installed within the recommended timeframe. If you’re working with professionals like Bayshore Exteriors, they’ll handle these details for you - monitoring UV exposure, ensuring proper flashing, and performing thorough inspections to protect your investment and maintain warranty coverage throughout the project.
Conclusion
Installing house wrap correctly ensures a continuous barrier against air and water, protecting your home’s framing, improving energy efficiency, and prolonging the life of your siding. To get it right, every step matters: start with clean, smooth walls, overlap properly at the sill plate, secure with plastic cap fasteners, tape seams and penetrations thoroughly, and carefully integrate flashing around windows, doors, and other openings. These details work together to create a reliable moisture barrier that safeguards both your home’s structure and energy performance.
Interestingly, most water-intrusion issues stem from problem areas like windows, doors, and utility penetrations - not the wall surfaces themselves. Catching these issues early can save you both time and money.
For those tackling house wrap installation themselves, using a detailed checklist can help cover all the critical steps. However, for more complex projects - like those involving windy conditions, intricate flashing, or multi-level designs - Bayshore Exteriors provides expert services. They specialize in installing house wrap alongside James Hardie siding and offer comprehensive exterior remodeling. Their attention to detail in consulting, planning, and installation ensures your home’s exterior is not only durable and code-compliant but also built to stand the test of time.
FAQs
Why should house wrap installation begin at the bottom of the wall?
Starting the installation of house wrap at the bottom of the wall is key to managing water effectively. This method ensures that moisture or rainwater naturally flows downward and away from the building, minimizing the chance of water seeping into the structure. Overlapping the wrap from the bottom upward creates a shingled effect, guiding water off the surface and preventing it from sneaking behind the wrap.
This technique helps safeguard your home against problems like mold, rot, and structural damage caused by trapped moisture. Beginning at the base lays the groundwork for a strong, weather-resistant barrier.
How do I make sure the house wrap is installed with the correct side facing out?
When installing house wrap, it's important to look for manufacturer markings or labels on the material. These often indicate which side should face outward. In most cases, the printed or textured side goes on the outside, while the smooth side faces the sheathing. To ensure you're doing it right, always review the installation instructions that come with the product. This simple step can help you avoid common errors.
What happens if utility penetrations aren't sealed properly?
When utility penetrations aren't sealed correctly, water can find its way into your home. Over time, this can result in major structural problems. Beyond that, lingering moisture can encourage mold growth, which isn't just a hassle - it can also impact your health. Air leaks caused by poor sealing can also make it tougher to maintain a comfortable indoor temperature, leading to higher energy bills.
By sealing these gaps, you help safeguard your home's structure, maintain a healthier environment, and improve energy efficiency - all of which contribute to a more comfortable and secure living space.