How to Seal Moisture Barriers with Flashing Tape
How to Seal Moisture Barriers with Flashing Tape
Water damage can be costly. Sealing moisture barriers with flashing tape is a simple way to protect your home. Here’s how to do it right:
- Prepare the Surface: Clean and dry the area to ensure proper adhesion.
- Measure and Cut: Cut the tape to size, allowing for overlaps (2–6 inches for seams).
- Apply Correctly: Press the tape firmly, avoiding stretching, and use a roller to eliminate air bubbles.
- Seal Vulnerable Areas: Pay extra attention to corners, windows, and penetrations.
- Inspect and Maintain: Regularly check for peeling or gaps and make repairs promptly.
Why it matters: Flashing tape prevents water intrusion, reduces mold risks, and improves energy efficiency. Choosing the right tape - like acrylic for durability or butyl for affordability - ensures long-term protection.
| Adhesive Type | Temperature Range | UV Resistance | Repositionable | Best Use |
|---|---|---|---|---|
| Asphalt | Limited in cold | Poor | No | Budget, mild climates |
| Butyl | Performs well in cold | Fair | No | Masonry, moderate areas |
| Acrylic | -18°F to 180°F | Excellent | Yes | All climates, durable |
How to install Zip Flashing Tape in a Corner
Preparing the Surface for Flashing Tape Application
Getting the surface ready is a crucial step to ensure flashing tape sticks properly and provides a durable, watertight seal.
Why Surface Preparation Matters
For flashing tape to adhere effectively, the surface must be clean and dry. Even a small amount of dirt or moisture can weaken the bond.
"Proper surface preparation is crucial for the effective adhesion of the flashing tape."
Architect Steve Baczek emphasizes this point:
"One of the most important steps in installing flashing tape is wiping the surface clean and making sure it is completely dry."
Skipping this step can lead to weak adhesion, especially at corners and edges, which may cause the tape to fail prematurely. Additionally, applying the tape in warm conditions helps the adhesive set correctly.
Once you understand the importance of preparation, it’s time to gather the tools you’ll need for a successful installation.
Tools and Materials Needed
Having the right tools on hand can make the installation process much smoother. Here’s what you’ll need:
- Cleaning Supplies: Use a stiff brush, clean cloths, mild detergent, water, and dry cloths to remove dirt and grime.
- Measuring and Cutting Tools: A measuring tape ensures accurate placement, while a sharp utility knife or scissors allows for clean cuts. A pencil or marker is helpful for marking measurements.
- Application Tools: A roller or squeegee is essential for applying even pressure and removing air bubbles. For porous or rough surfaces, consider using a roofing primer to improve adhesion.
- Testing Materials: Clear packing tape can help you test the surface for cleanliness before applying the flashing tape.
Organizing these tools ahead of time will save you effort and ensure a smoother installation process.
Inspecting the Moisture Barrier and Surrounding Areas
Before you start cleaning, take a moment to inspect the moisture barrier and nearby areas for any potential issues. Here’s what to look for:
- Structural Irregularities: Check for cracks or gaps. Repair and allow them to cure before moving forward.
- Surface Contamination: Remove oil, paint, or other residues using a damp rag or mild solvent.
- Moisture: Make sure the surface is completely dry. If conditions are humid or it has recently rained, allow extra time for drying.
A simple way to confirm cleanliness is the Clear Tape Test, as described in a Chase Corp technical article from October 2020. Press clear packing tape onto the cleaned surface, then peel it off slowly. If dirt sticks to the tape, clean the surface further.
Additionally, think about environmental factors. Check for areas prone to pooling water or movement, and focus on regions around penetrations, corners, and transitions between different materials. Addressing these potential problem areas during your inspection will go a long way in ensuring a strong, long-lasting seal.
Step-by-Step Guide to Sealing Moisture Barriers with Flashing Tape
Creating a watertight seal with flashing tape starts with a clean, dry surface and proper application techniques. Below is a detailed guide to help you get it right.
Measuring and Cutting the Flashing Tape
Accurate measurements are key. Measure each section carefully, allowing for overlaps - at least 2 inches for horizontal seams and up to 6 inches for vertical ones. Overlapping is critical to ensure a reliable seal and prevent water intrusion. Mark your measurements clearly before cutting to reduce waste and ensure proper coverage, especially around tricky areas like windows and doors.
When cutting the tape, use a sharp utility knife or scissors for straight, clean edges. Dull blades can create jagged cuts that may not seal effectively. For added durability, slightly round the corners of each piece to minimize peeling over time. Taking these extra steps ensures better adhesion and a more professional finish.
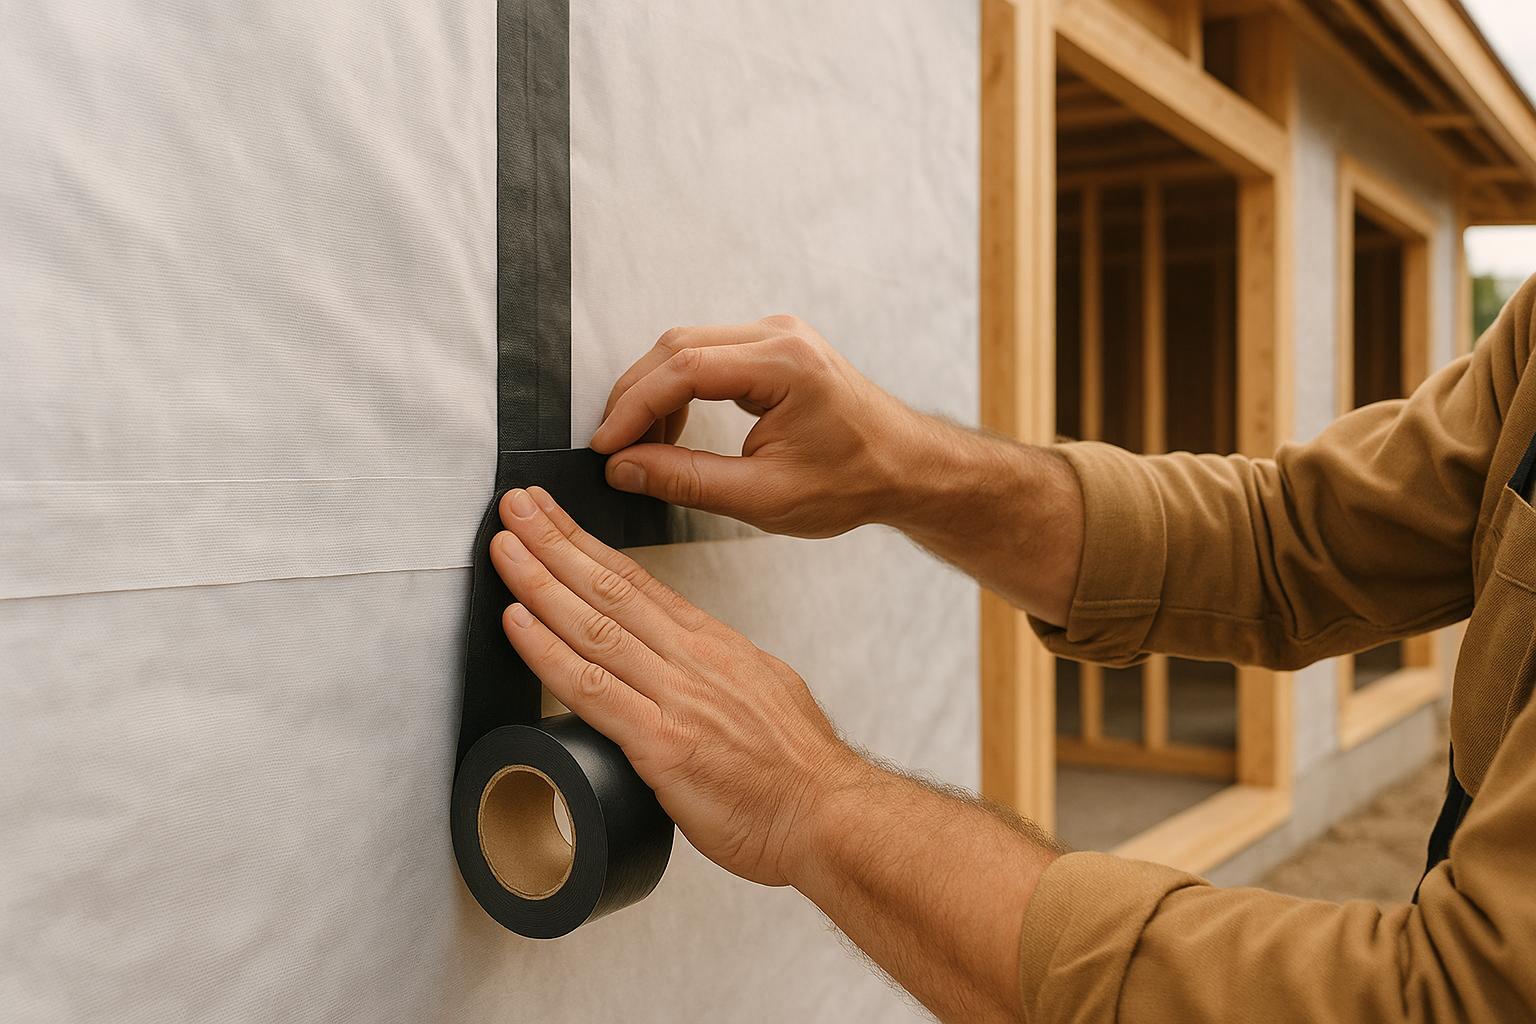
Applying Flashing Tape Correctly
Flashing tape adheres best when applied at temperatures above 40°F (4°C). Position the tape carefully, then peel back the release liner as you press it firmly into place. Use a roller or squeegee to apply even pressure, starting from the center and working outward. This technique eliminates air bubbles and wrinkles, ensuring a smooth, tight seal.
Avoid stretching the tape during application, as this can weaken the adhesive and lead to lifting over time. Pay close attention to the edges, pressing them down firmly to prevent water from sneaking underneath. Proper application across the entire surface ensures a strong bond between the tape and the moisture barrier.
Sealing Corners and Penetrations
Corners and penetrations require extra care, as they are the most vulnerable to leaks. For inside corners, use 6-inch tape centered in the corner. Press the center sharply with a squeegee to form a crease, then secure both sides. If 6-inch tape isn’t available, overlapping two layers of 3¾-inch tape can work as an alternative.
For outside corners, center the 6-inch tape over the corner and wrap it tightly with even pressure. For wall penetrations with flanges, apply tape in this order: bottom, sides, and top. Extend the tape at least 1 inch beyond the edges, with a 2-inch offset on the top. For penetrations without flanges or those with curved sides, use an approved flashing boot and secure it with tape.
Inspection and Touch-Up
Once the tape is applied, inspect your work thoroughly while your tools are still on hand. Check for any lifted edges, bubbles, or gaps, and apply pressure immediately to fix them. The adhesive bonds best when freshly applied, so addressing these issues right away is crucial.
Pay particular attention to corners and penetrations, as they are prone to water collection. If you notice areas where the tape isn’t lying flat or adhering properly, clean the surface and reapply a new piece with adequate overlap. Small fixes during installation can save you from major problems down the line.
In testing by Construction Instruction, LP WeatherLogic panels with properly applied tape showed no water intrusion after enduring a simulated 50-mph, 15-minute rainstorm. In contrast, standard housewrap allowed water to leak into the wall cavity. Keeping a record of any repairs or adjustments will also help with future maintenance.
For additional tips and professional advice on moisture barrier installations, Bayshore Exteriors offers expert guidance to ensure your home stays protected from the elements.
sbb-itb-85e0110
Choosing the Right Flashing Tape for Your Project
Picking the right flashing tape is crucial to keeping moisture at bay for the long haul. With so many adhesive types and facer materials available, understanding your options is key to making the best choice for your project. Let’s dive into the details to help you make an informed decision.
Types of Flashing Tape
Adhesive Technologies
Flashing tapes come with three main types of adhesives, each with its own strengths and weaknesses:
- Asphalt-based tapes are budget-friendly but come with some trade-offs. Over time, they can become brittle, release volatile organic compounds (VOCs), and often need a primed surface for proper adhesion.
- Butyl adhesives stick well to surfaces like masonry but aren’t repositionable. They can dry out over time, degrade under UV light, and also emit VOCs.
- Acrylic adhesives are the high-performance option. While they cost more upfront, they don’t release harmful off-gases, form stronger bonds over time, and handle extreme temperatures without breaking down. They’re also UV-resistant and can be repositioned during installation, making them a versatile choice for both indoor and outdoor applications.
Facer Materials
The outer layer of flashing tape plays a big role in both durability and ease of use:
- Aluminum facers are great for UV resistance but lack flexibility, which can lead to cracking under stress.
- Plastic-based facers, often made from polypropylene or polyethylene, are more elastic and tear-resistant. They seal well around fasteners and hold up better against prolonged UV exposure.
Key Properties to Consider
When selecting flashing tape, keep these factors in mind:
- Temperature Performance: This is especially important in extreme climates. Asphalt-based tapes can lose their stickiness in cold weather, while butyl and acrylic adhesives perform better. Some acrylic tapes, like TYPAR Construction Products’ All-Temperature Flashing, can be installed in temperatures as low as 0°F (-18°C) and remain stable up to 180°F (82°C).
- UV Resistance: Long-lasting performance under sunlight is crucial. Acrylic adhesives excel here, while asphalt and butyl tapes tend to break down over time.
- Substrate Compatibility: Different tapes bond better with specific materials. Some may need a primer for proper adhesion, so always check the manufacturer’s recommendations for your chosen substrate.
Comparison of Flashing Tape Options
Here’s a quick breakdown of the key differences between the adhesive types:
| Adhesive Type | Temperature Range | UV Resistance | Repositionable | VOC Emissions | Best Applications |
|---|---|---|---|---|---|
| Asphalt | Limited in cold weather | Poor – degrades quickly | No | Yes | Budget projects in mild climates |
| Butyl | Performs well in cold | Fair – degrades over time | No | Yes | Masonry applications in moderate climates |
| Acrylic | -18°F to 180°F | Excellent – holds up well | Yes | No | All climates, long-term installations |
The construction flashing and tapes market, currently valued at $2.1 billion and growing at 6% annually, highlights how these products have shifted from being optional to essential in modern building design.
For long-term projects, acrylic tapes often justify their higher cost with superior durability and performance. Butyl tapes, on the other hand, offer a good balance of cost and reliability for shorter-term or budget-conscious projects. Choosing the right tape not only ensures a durable seal but also complements the installation techniques covered earlier.
Alex Lukachko, a researcher at Building Science Corp., underscores the importance of careful tape selection:
"For each hole in the building enclosure, subcontractors need to know that the hole is a break in the continuous rainwater control, air flow control, moisture control and thermal control layers in the building enclosure."
Maintaining and Ensuring Longevity of Sealed Moisture Barriers
Keeping your home protected from water damage starts with maintaining the integrity of your sealed moisture barriers. While proper installation sets the foundation, regular upkeep ensures these barriers continue to shield your home effectively. Neglecting maintenance can turn small issues into costly repairs down the line.
Routine Inspections
Seasonal Check-ups Matter
To keep your sealed moisture barriers in good shape, plan to inspect them twice a year - spring and fall are ideal since the weather is more cooperative. Focus on areas where flashing tape has been applied, such as around windows, doors, and any exterior penetrations.
During these inspections, look for cracks, peeling, or gaps in the flashing or sealant. Pay close attention to spots where different materials meet, as they often bear the brunt of thermal expansion and contraction.
Signs to Watch For
Be vigilant for early indicators that your flashing might need attention. Peeling paint, mold, or damp drywall near windows are red flags that moisture could be creeping in. These clues often surface before major water intrusion, giving you a chance to act early.
Don’t just rely on sight - press on the tape to check if it's still firmly attached. If it feels loose or lifts easily, repairs are needed. Also, inspect for rust, corrosion, or loose fasteners around the sealed areas. Addressing these issues promptly helps maintain a continuous and effective seal.
Addressing Common Issues
Spotting Problems Early
Over time, factors like extreme temperatures, UV exposure, and natural building movement can cause flashing tape to deteriorate. Even the best-installed tape needs periodic maintenance to stay effective. Regular checks ensure you catch problems before they escalate.
Simple Repair Solutions
When you notice damage, act quickly to prevent water from seeping in. For minor issues, you can often handle repairs yourself. Start by cleaning the area around the damaged spot - remove dirt, debris, and loose material to ensure the new sealant or tape adheres properly. For small cracks or gaps, apply roofing cement or additional tape to restore the seal.
However, if you see widespread peeling, large gaps, or recurring issues in the same area, it might be time to replace the flashing tape entirely. These small, consistent repairs go a long way in preserving your home’s defenses.
Long-Term Maintenance Tips
Invest in Quality Materials
Using high-quality materials is key to keeping your moisture barriers effective for the long haul. Look for materials with strong air and moisture resistance and low permeability, as these are built to last. UV resistance is especially important since prolonged exposure to sunlight can weaken the tape over time.
Acrylic tapes are an excellent choice - they actually strengthen as time goes on and can handle extreme temperatures ranging from -30°F to 300°F without losing their grip. Unlike other options, acrylic tape resists damage from UV light, chemicals, and oxidation.
Stay Proactive
Simple steps like keeping gutters clear and trimming vegetation near your home can reduce moisture buildup and improve air circulation. These small efforts can make a big difference in preventing damage.
For even better results, consider high-performance systems. For example, VYCOR® weather barriers and flashing tapes have been proven by Oak Ridge National Labs to reduce air leakage by 7 times compared to a leading house wrap brand. This can translate to up to 56% lower heating and cooling costs.
Know When to Call the Experts
While basic maintenance and minor fixes are manageable for most homeowners, some situations call for professional help. If you’re dealing with extensive flashing failure, structural concerns, or hard-to-reach areas, it’s worth investing in expert services. Companies like Bayshore Exteriors (https://bayshoreexteriors.com) specialize in high-quality exterior repairs and renovations.
Spending a little on regular maintenance and timely repairs can save you from the hefty costs of fixing water-damaged interiors, insulation, or structural elements. It’s a smart trade-off for peace of mind.
Conclusion
Sealing moisture barriers with flashing tape is a key step in protecting your home from water damage. It all starts with proper surface preparation - clean, dry surfaces are essential for ensuring strong adhesion and effective sealing.
Once the surface is ready, precise installation becomes the focus. Applying flashing tape correctly not only secures the seal but also takes advantage of the tape's flexibility. Unlike traditional metal flashings, modern flashing tapes can easily adapt to various shapes, making them a practical choice. As industry expert Henry explains:
"Flashing tape is one of the key components of an effective weatherization system. Selecting the right products for your project and installing them properly can help you prevent the leaks and callbacks that can ruin your reputation."
For long-term success, material compatibility and regular inspections are critical. Routine checks help identify and resolve potential issues before they become bigger problems. Additionally, integrating flashing tape into a broader waterproofing system adds another layer of protection. Research shows that sealing house wrap joints with manufacturer-approved seaming tape can enhance performance by about 20%. Pairing this with proper drainage planning creates a robust defense against moisture.
FAQs
What’s the difference between acrylic, butyl, and asphalt flashing tapes, and how do I choose the best one for sealing moisture barriers?
When it comes to flashing tapes, the choice between acrylic, butyl, and asphalt largely depends on the specifics of your project and the conditions you'll be working in. Each type has its own set of strengths:
- Acrylic flashing tape handles a wide range of temperatures and resists surface moisture, making it a versatile option. That said, it may not hold up as well in extremely cold weather.
- Butyl flashing tape is known for its flexibility and strong adhesion, even on tricky surfaces. It also performs well in colder temperatures, but it tends to be pricier than other options.
- Asphalt flashing tape is a cost-effective choice for standard sealing needs. However, it’s less flexible and can become messy in high heat due to oozing.
To make the right pick, think about your climate, the surface you're working with, and how much you’re willing to spend. Acrylic is a solid choice for varying temperatures, butyl shines when flexibility or challenging surfaces are involved, and asphalt works well for basic, budget-friendly sealing tasks.
How can I make sure my flashing tape stays effective in harsh weather conditions?
To make sure your flashing tape performs well in tough weather conditions, start by selecting a durable, weather-resistant tape that can handle UV rays, heat, and moisture. Getting the surface ready is just as important - ensure it's clean, dry, and free of debris to help the tape stick properly. If you're working in cold or damp conditions, try to get the surface as dry as possible before applying the tape.
For optimal results, apply the tape when the weather is dry, and double-check that all seams, edges, and penetrations are fully sealed. Choosing a tape known for its flexibility and strength will help it stay secure even when temperatures shift. A careful and thorough installation will keep your moisture barrier reliable for years, even in harsh climates.
What mistakes should I avoid when preparing the surface and applying flashing tape for a watertight seal?
To achieve a reliable, watertight seal with flashing tape, it's crucial to steer clear of a few frequent missteps:
- Skipping surface prep: Make sure the surface is completely clean and dry before applying the tape. Dust, dirt, or moisture can weaken the adhesive bond.
- Improper overlapping: Always overlap the tape by at least 2 inches to form a secure barrier against water intrusion.
- Neglecting pressure application: Use a roller or apply firm hand pressure to ensure the tape adheres evenly and securely.
- Using the wrong tape: Choose a flashing tape designed specifically for your project and suited to the weather conditions in your area.
By following these guidelines, you can create a durable seal that helps protect your home from water damage. For larger exterior projects, it might be worth reaching out to experts like Bayshore Exteriors, who offer specialized solutions to improve both the durability and appearance of your home.