How to Flash Window Trim for Moisture Protection
How to Flash Window Trim for Moisture Protection
Did you know 80% of window leaks happen due to improper flashing? Poor flashing can lead to water damage, mold, and repair costs ranging from $5,000 to $10,000. Proper window flashing is essential to keep moisture out and protect your home’s structure, energy efficiency, and resale value.
Key Takeaways:
- Flashing Basics: It’s a waterproof barrier that seals gaps around windows to prevent water intrusion.
- Materials: Popular options include self-adhering tape, metal flashing, rubberized asphalt, and liquid flashing.
- Installation Steps:
- Prep the window opening by cleaning and sealing gaps.
- Apply sill flashing to direct water outward.
- Install side and head flashing in a layered, shingled pattern.
- Seal edges with high-quality elastomeric sealant.
- Avoid Common Mistakes: Skipping flashing, reverse overlaps, and using incompatible materials can lead to leaks and costly repairs.
Proper installation can save $200 per window annually by avoiding water damage and improving energy efficiency. For long-term protection, ensure flashing integrates with house wraps and drainage systems. Ready to protect your home? Let’s dive into the details.
Window Trim Flashing Basics
What is Window Flashing?
Window flashing is a thin, waterproof barrier designed to keep water out of the gaps between your window frame and your home's exterior. By sealing these vulnerable areas, it directs water away, protecting your walls, foundation, and insulation from moisture damage. When installed correctly, flashing can help prevent issues like mold growth, wood rot, and even structural problems.
Let’s take a closer look at the different materials you can use to match your specific project needs.
Types of Flashing Materials
Choosing the right flashing material depends on factors like your budget, the climate where you live, and the particular requirements of your windows. Here are some commonly used options:
- Self-adhering flashing tape: A popular choice because it creates an airtight and watertight seal while easily conforming to uneven surfaces.
- Metal flashing: Durable materials like aluminum, copper, or galvanized steel provide excellent protection against the elements.
- Liquid flashing: A flexible option that works well for filling small gaps in irregular installations.
- Rubberized asphalt flashing: Known for its strong adhesive properties and ability to withstand harsh weather, this is especially effective in areas with heavy rainfall.
- Vinyl flashing: Lightweight and resistant to corrosion, vinyl is an affordable option for humid climates, though it may not last as long as metal alternatives.
How Water-Resistive Barriers Work with Flashing
Using flashing alone isn’t enough - pairing it with a water-resistive barrier (WRB) is key for maximum moisture protection. A WRB, like housewrap, works alongside flashing to prevent water from getting behind your exterior cladding. For the best results, the WRB should be installed continuously around windows and doors, ensuring the flashing either extends to the exterior finish or connects seamlessly with the WRB.
Many professionals use a lapping or shingling method to integrate windows with WRBs. This technique directs water downward, away from the rough opening of the window. Always follow the window manufacturer’s instructions first, and then refer to the WRB guidelines to make sure both systems work together effectively.
For expert advice and high-quality installation, you can explore the services offered by Bayshore Exteriors.
"Flash the rough opening, not the window." - Martin Holladay, GBA Editor
To keep your moisture barrier effective, inspect your flashing and sealants regularly for any signs of cracks or peeling. Proper maintenance can go a long way in protecting your home.
Tools and Materials You Need
Required Tools
Once you’ve got a handle on flashing materials and weather-resistant barriers (WRBs), it’s time to gather the right tools. Using the proper tools not only makes the job easier but also ensures a clean, professional finish for your window flashing installation. Here’s what you’ll need:
- Drill/driver: Essential for securing materials in place.
- Circular saw: Ideal for cutting trim pieces to size.
- Reciprocating saw: Perfect for making precise cuts in tight spaces, especially around existing windows.
- Measuring and layout tools: A tape measure, framing square, and level are indispensable for accuracy.
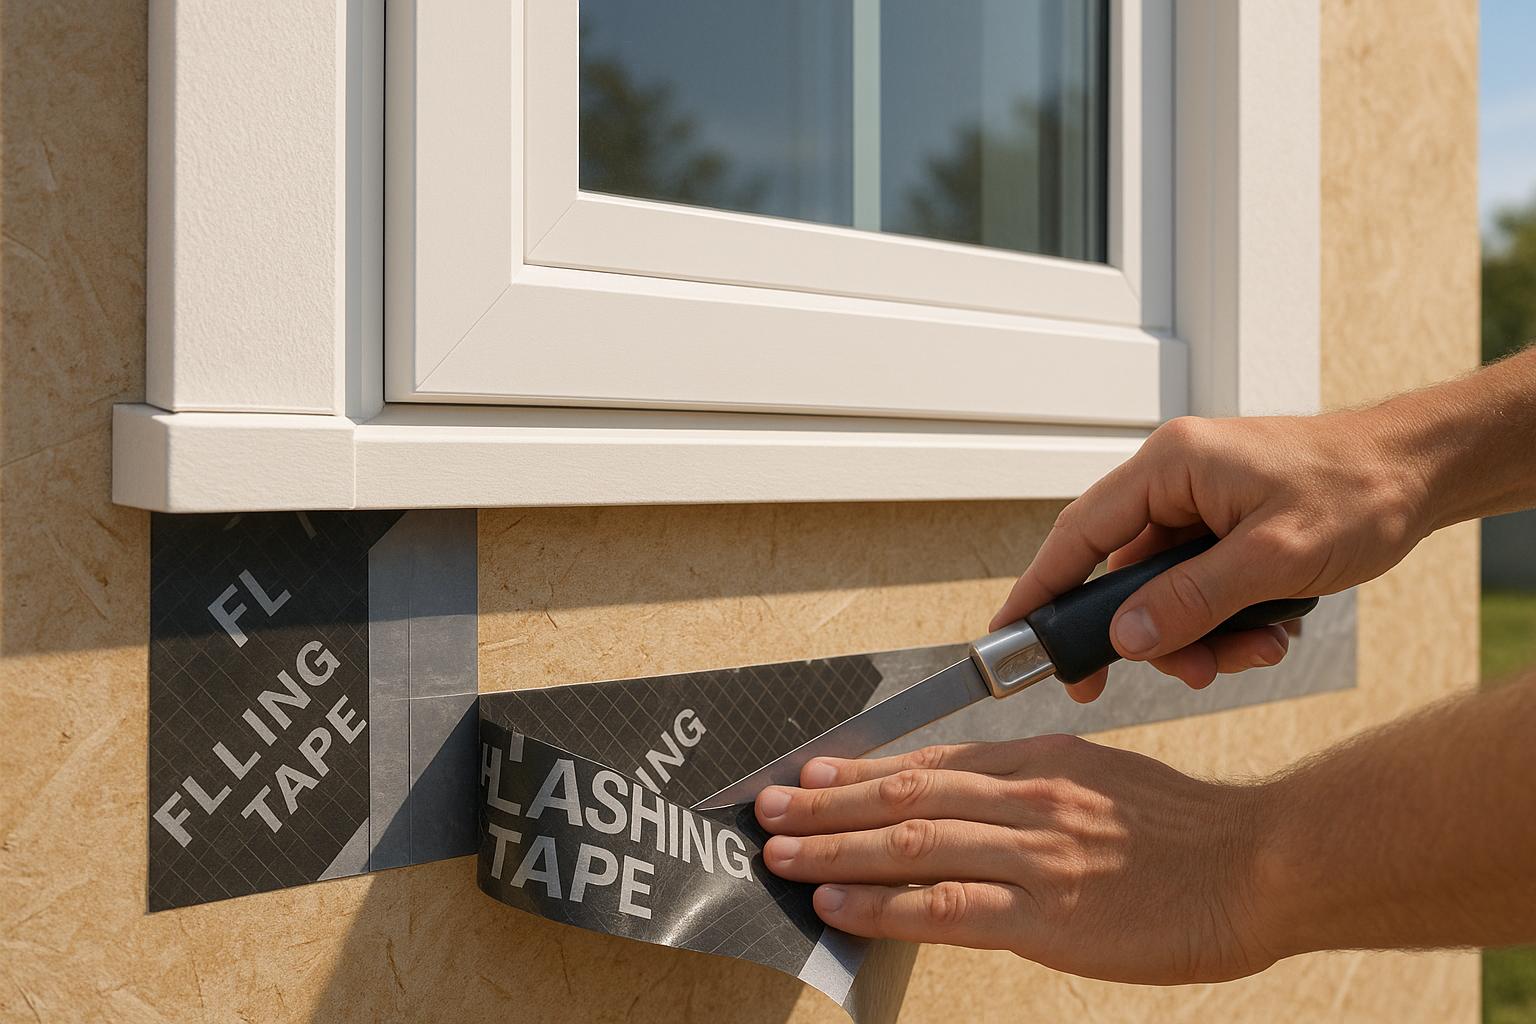
- Sharp utility knife: Great for cutting flashing tape and trimming materials to fit snugly.
- Caulk gun: Necessary for applying sealants to achieve watertight seals.
- J-roller: Helps press flashing tape firmly into place, eliminating air gaps for a proper seal.
- Basic hand tools: A hammer and screwdrivers are always handy, while wood shims can help level uneven surfaces.
For custom metal flashing, you’ll need a sheet-metal brake to bend cap flashings to the correct angles. If you’re tackling a larger project, pneumatic tools can save time, though they’re not essential for most DIYers.
And don’t forget about safety! Gloves are a must to protect your hands from sharp edges and rough materials.
Selecting the Right Materials
The materials you choose play a critical role in how effective and long-lasting your flashing will be. Self-adhering flashing tape is a go-to option in residential construction because it creates a reliable moisture barrier when installed correctly. For the best results, pick a tape that’s 2 to 3 inches wider than your window trim to ensure full coverage.
Sealants are another key component. A high-quality elastomeric sealant is excellent for filling gaps and creating a complete seal. It’s also flexible enough to handle the natural expansion and contraction caused by temperature changes. For more complex installations, fluid-applied flashings can provide seamless coverage where traditional tape might not work as well.
Here’s a quick comparison of popular flashing materials:
| Material Type | Cost Range | Lifespan | Best Climate | Key Benefits |
|---|---|---|---|---|
| Aluminum Flashing | $5–$10/linear ft | 15–20 years | Moderate climates | Lightweight, corrosion-resistant, easy to install |
| Copper Flashing | $15–$20/linear ft | 50+ years | All climates | Extremely durable and long-lasting |
| Galvanized Steel | $7–$15/linear ft | Good durability | Most climates | Strong and cost-effective compared to copper |
Choosing the right material depends on factors like your home’s climate. For example, aluminum flashing is a budget-friendly option, costing $5–$10 per linear foot, and lasts 15 to 20 years with minimal upkeep. On the other hand, copper flashing, though pricier at $15–$20 per linear foot, can last over 50 years, making it a smart choice for permanent installations.
Material compatibility is another important consideration. Make sure your flashing material works well with the surrounding materials to prevent corrosion. For window trim, synthetic options like cellular PVC or poly-ash composites are better at resisting water compared to traditional wood. Lastly, ensure your flashing system integrates seamlessly with your house wrap and drainage plan for optimal performance.
How to Flash Window Trim Step by Step
Preparing the Window Opening
Before you begin flashing, it’s essential to prepare the window opening to ensure the flashing materials adhere properly and create a watertight seal.
Start by inspecting the window opening. Clear out any debris, paying close attention to the corners and edges. If you find any gaps or holes, fill them with spray foam. Once the foam has cured, use a rasp tool to roughen the surface for better adhesion. Then, cut the weather-resistive barrier (WRB) vertically and horizontally at the center to create flaps. Seal the seams with a high-quality polyurethane sealant, making sure it extends beyond the flashing edge for added protection.
With the opening ready, you can move on to installing the sill flashing.
Installing Sill Flashing
Sill flashing is your first line of defense against water intrusion. It protects the framing and directs any water that gets through the window assembly away from your home. You can use either a preformed sill pan or flashing tape for this step.
If you’re using flashing tape, apply a continuous self-adhesive strip across the sill. Make sure it covers both the front and back edges and extends at least 6 inches up the sides. Use a J-roller to smooth out air bubbles and wrinkles, ensuring a watertight seal.
"Proper sill flashing needs an end dam to ensure any water that does reach the sill flashing is forced to drain to the outside." - Richard Baker, Program Manager of the Builder Solutions team at IBACOS
To create a back dam, run a continuous bead of sealant along the interior edge where the window unit meets the sill and up each jamb. This will direct any water behind the window to drain outward. However, do not seal the bottom nailing flange of the window unit - this gap allows trapped water to escape.
Installing Side and Head Flashing
Once the sill is complete, it’s time to install the side and head flashing. Start by attaching the side flashing in a shingled pattern, overlapping the sill flashing by at least 3 to 4 inches on each side. Next, install the head flashing so it overlaps the side pieces, directing water away from the assembly. Press the flashing firmly in place to eliminate air pockets.
This layering technique is critical for effective water management. Each piece of flashing should overlap the one below it, creating a system where water flows outward and away from the window. Even if one seal fails, the underlying layers will continue to protect your home.
Sealing and Final Steps
With all flashing layers installed, finish the job by sealing everything properly. Use a high-quality elastomeric sealant to seal around the edges of the window. Apply caulk along the seams and smooth it out for a clean, polished look. Go over all the flashing layers with a J-roller to ensure they’re pressed down firmly, paying special attention to corners and overlapping sections.
Finally, inspect all seams and overlaps for any loose edges or gaps. Address any issues immediately to ensure a secure, watertight installation.
For more expert tips on protecting your home’s exterior, check out Bayshore Exteriors at https://bayshoreexteriors.com.
sbb-itb-85e0110
How To Flash A Window Sill, Jamb, And Header And Properly Install A Window!
Common Flashing Mistakes to Avoid
Steer clear of these frequent flashing errors to save yourself from expensive water damage. Building on the fundamental principles of flashing, let’s dive into what to avoid and how to get it right.
What Not to Do
Skipping flashing altogether can be a costly oversight. Did you know that up to 80% of water leaks around windows are caused by poorly installed or missing flashing? These leaks can lead to repair costs ranging from $5,000 to $10,000, with mold remediation adding another $1,500 to $3,500 to the bill.
"Even the most top-of-the-line building materials can fail if improperly installed." - Benjamin Obdyke
Another common mistake is incorrect overlapping - often called reverse overlaps - which allows water to sneak behind the protective barrier instead of being directed away. Poor installation practices like this account for up to 50% of water damage claims.
Using incompatible materials is another pitfall. For example, pairing aluminum flashing with galvanized steel fasteners leads to galvanic corrosion. The different metals expand and contract at varying rates, creating gaps where water can seep in.
Excessive caulking might seem like a good idea, but it can actually trap water, leading to rot and mold. Similarly, stretching flashing tape during installation weakens its adhesive bond. Over time, as the tape tries to return to its original size, it can pull away from the surface, leaving gaps for water intrusion.
Here’s a real-world example: In Bedford, NH, improper flashing around a chimney caused significant damage. The flashing didn’t overlap correctly, and deteriorating sealant allowed water to penetrate. This led to water stains, rotted roof decking, and attic mold, with the damage extending into the home’s interior.
| Improper Practice | Consequence | Prevention |
|---|---|---|
| Improper Material Choice | Corrosion, leaks, flashing failure | Use materials compatible with your window type and local climate conditions. |
| Incorrect Installation | Gaps, water entry, water damage | Ensure proper layering, secure sealing, and hire professionals when needed. |
| Neglecting Maintenance | Wood rot, mold, energy inefficiency | Schedule regular inspections and fix small issues before they escalate. |
| Skipping WRB Integration | Water infiltration behind flashing | Always integrate flashing with house wrap or a water-resistant barrier. |
By steering clear of these mistakes, you’ll lay the groundwork for a successful installation. Now, let’s look at how to do it right.
Tips for Proper Installation
Always stick to the manufacturer’s instructions for every flashing product. Each material has specific requirements for temperature, surface preparation, and application. Ignoring these guidelines can void warranties and increase the chances of failure.
Before applying any flashing material, make sure the surfaces are clean and dry. Dust, debris, or moisture on window sills or the water-resistive barrier (WRB) can prevent the flashing from adhering properly.
"If you want to end up with an energy efficient, smooth operating, and long-lasting window, every step of the installation process needs to be executed with the greatest attention to detail." - Marvin
Use a flashing membrane roller to ensure a tight seal when working with self-adhered products. Hand pressure alone may not activate the adhesive fully.
As you secure the nailing fins, check and double-check the window’s alignment. It should stay centered, level, plumb, and square throughout the process. If the window becomes hard to operate, it could be a sign of over-tightened fasteners or too much expanding foam.
Proper drainage is critical. Make sure the sill is sloped to direct water outside, and consider adding a back dam to keep water from reaching the wall cavity.
"A missing window head flashing is one of the most overlooked details I see. The idea is to keep water moving so it can't find a place to sit. If it sits, there's a chance it can find a hole and end up inside the building." - Randy Williams, Construction Industry Professional
Layering is everything when it comes to flashing. Each piece should overlap correctly to guide water away from the structure. Start with the sill flashing, then move to the sides, and finish with the head flashing.
If your project involves multiple building systems - like windows, siding, insulation, and moisture barriers - it’s worth hiring a professional. Proper installation not only prevents headaches but can also save homeowners an estimated $200 per window annually in maintenance costs.
Protect Your Home with Proper Flashing
Installing proper window flashing is one of the best ways to protect your home from water damage. In fact, many window-related leaks stem from poorly installed or missing flashing. When done correctly, flashing creates a reliable moisture barrier that safeguards your home - and your wallet.
Water damage repairs can cost anywhere from $5,000 to $10,000. By ensuring flashing is installed properly, homeowners can save an estimated $200 per window each year by avoiding costly repairs and mold remediation fees. And the benefits don’t stop there - proper flashing also contributes to better energy efficiency.
"Most window leaks are a result of incorrect flashing installation. New window installations and replacements should take this into consideration." - Bayview Windows
Beyond protecting against water damage, high-quality flashing helps seal your home against air leaks, which can lead to savings of 10–15% on heating and cooling costs. It can also reduce indoor allergens by up to 30%, improving your home’s air quality.
When flashing is installed correctly, it not only prevents water intrusion but also adds measurable value to your home. Homes with proven water-resistant features, such as quality flashing, often sell for up to 10% more. While it’s possible to tackle flashing installation as a DIY project, it’s a complex process that involves coordinating with house wrap, siding, and drainage systems. Professional installation is generally the smarter choice, as it reduces the risk of errors by 40%.
For those looking for expert help, Bayshore Exteriors specializes in professional window installation and exterior remodeling. Their team ensures that flashing is seamlessly integrated with your home’s overall weatherproofing system, offering peace of mind and long-term protection.
FAQs
How can I tell if my window flashing is damaged and needs to be replaced?
If your window flashing isn’t doing its job, you might start noticing water stains, moisture buildup, or even leaks around the window frame. Other red flags to watch for include peeling paint, bubbling siding, or warped or corroded flashing material near the window. Ignoring these signs could lead to significant water damage over time. Spot any of these issues? It’s worth inspecting the flashing and possibly calling in a professional to replace it, ensuring your home stays safe from further moisture troubles.
How do I choose flashing materials that work with my windows and home materials?
To make sure your flashing materials work well with your windows and home, it’s important to consider both chemical and physical compatibility. Some materials can cause issues like corrosion or damage when combined with certain surfaces or sealants. For instance, flashing tapes should be suitable for use with windows made of vinyl, wood, or metal. Always double-check the manufacturer’s specifications to ensure the materials are a good match.
Take time to review product datasheets and installation guidelines to confirm that everything will fit together properly. Opting for high-quality, self-adhering flashing designed to keep moisture out can go a long way in preventing leaks and avoiding costly damage over time. If you’re unsure about the right choice, consulting a professional - like Bayshore Exteriors - can help you get expert advice tailored to your home’s specific needs.
Why should I hire a professional for window flashing installation instead of doing it myself?
Hiring an expert for window flashing installation is a smart move if you want to keep your home safe from water damage. Proper sealing is critical to prevent water from sneaking in, which could lead to moisture problems, mold, or even damage to your home's structure. Professionals know how to get it right the first time, steering clear of common DIY pitfalls like using the wrong techniques or failing to seal properly - mistakes that can result in leaks and expensive repairs later.
Another big advantage? Professionals make sure the work meets local building codes and standards, so you can rest easy knowing the job is done correctly. Their know-how not only boosts the lifespan of your window trim but also saves you the hassle and time of doing it yourself. It’s a convenient way to protect your home while freeing you up to focus on other things that matter.