
What James Hardie Siding Installation Looks Like in Tampa Bay
Tampa Bay James Hardie siding checklist: verify Hillsborough permit, active CGC license, HZ10 materials, inspection closeout.
Lorem ipsum dolor sit amet, consectetur adipiscing elit. Suspendisse varius enim in eros elementum tristique. Duis cursus, mi quis viverra ornare, eros dolor interdum nulla, ut commodo diam libero vitae erat. Aenean faucibus nibh et justo cursus id rutrum lorem imperdiet. Nunc ut sem vitae risus tristique posuere.
If your James Hardie siding job in Tampa Bay does not include a permit, an active CGC license, and HZ10 materials, you should stop before work starts.
For homes in Hillsborough County, siding replacement over 100 square feet needs a county permit and work that follows the Florida Building Code, 8th Edition. Your contract should list James Hardie HZ10 for local heat, humidity, salt air, and wind exposure. You should also expect clear site prep, visible in-progress details like starter strips and wrap, and a final county inspection before the permit closes.
Here’s the short version:
- Check the permit on HillsGovHub before day one
- Check the contractor license on MyFloridaLicense.com and make sure the CGC status is active
- Confirm HZ10 in writing in the contract and on material labels
- Expect the house to look unfinished mid-job while wrap, strips, and panel gaps are still visible
- Do not treat the job as done until Hillsborough County closes the permit after inspection
- Review the finish work for straight lines, clean trim, joint caulk, and at least 6 inches of ground clearance where required
- Keep your records: permit, passed inspection, warranty papers, and HZ10 product details
Think the job ends when the last board goes up? But it doesn’t. The last step is the county sign-off, and that record is what shows the project is complete.
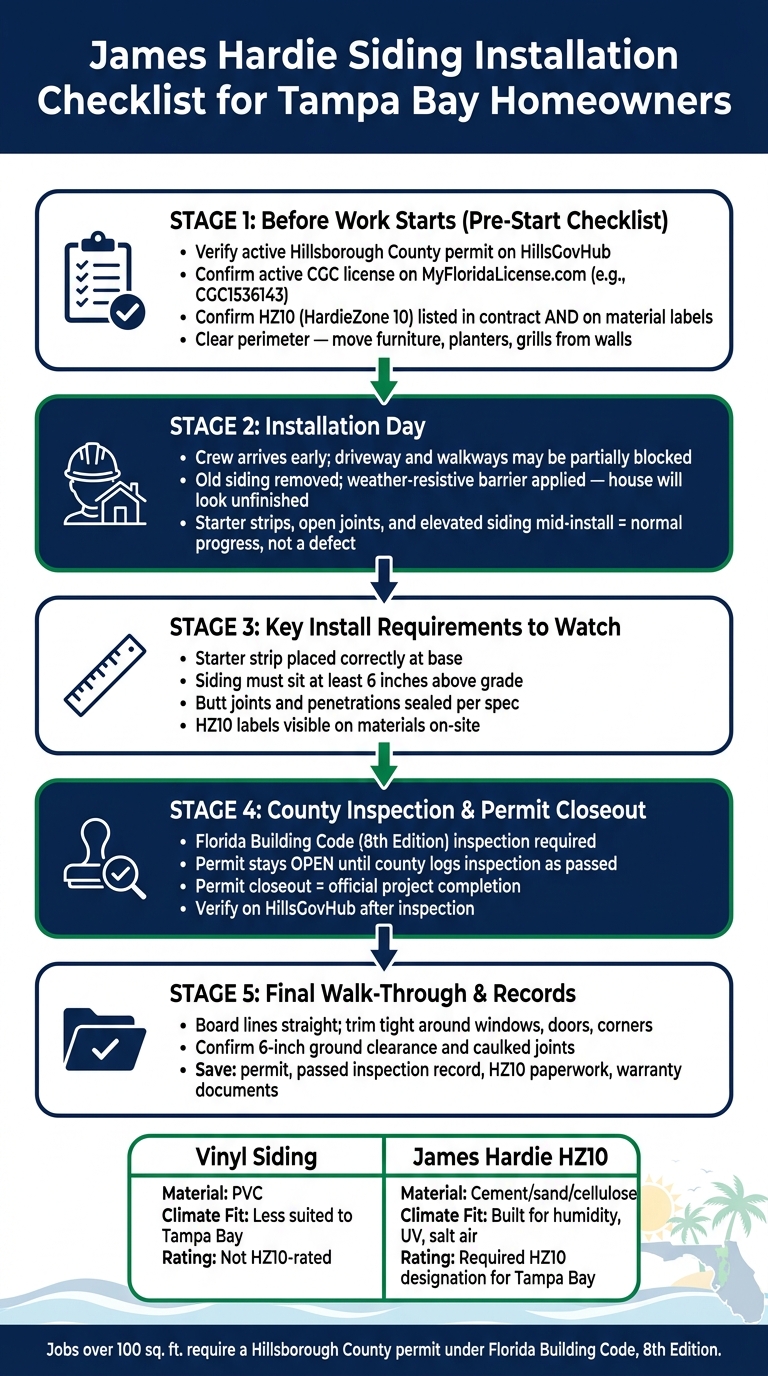
James Hardie Siding Installation Checklist for Tampa Bay Homeowners
Quick Comparison
| Checkpoint | What you should see | Why it matters |
|---|---|---|
| Permit | Active Hillsborough County permit | Jobs over 100 sq. ft. need approval |
| License | Active Florida CGC license | Confirms the contractor can pull the permit |
| Product | HZ10 in contract and on labels | Matches Tampa Bay weather demands |
| Mid-project appearance | House wrap, starter strips, open joints | Often shows work in progress, not a defect |
| Clearance | At least 6 inches above grade where required | Ties to install rules and warranty terms |
| Final step | Passed inspection and closed permit | Shows the job is officially finished |
The rest of the article walks you through what to check before work starts, what installation day may look like, how permit closeout works, and how fiber cement compares with vinyl for Tampa Bay homes.
sbb-itb-85e0110
What to confirm before siding installation begins in Hillsborough County
Use this as your pre-start checklist. Before the crew shows up, confirm three things: an active Hillsborough County permit, an active CGC license, and HZ10 listed in the contract.
Confirm permit status, contractor license, and project scope before day one
Your contractor should pull the permit with a valid Florida Certified General Contractor license. That means a CGC license, not just a vague "licensed and insured" line. A CGC number looks like CGC1536143.
Check the contractor's status on MyFloridaLicense.com through the Florida Department of Business and Professional Regulation. Search by the contractor's name or license number, then make sure the status says Active.
Next, check HillsGovHub using your address to make sure the permit is on file. Then confirm the project scope in writing: walls, trim, and penetrations. If it's not spelled out, fix that before day one.
Once you've locked down the paperwork, move to the product details and site prep.
Get James Hardie HZ10 product designation and warranty requirements confirmed in writing
For Tampa Bay homes, your contract should name James Hardie HZ10 (HardieZone 10). Check the contract. Then check the material labels. Both should show HZ10.
You also want the install plan to cover these warranty-related items:
- Starter strip must be placed the right way.
- Siding must stay at least 6 inches above grade.
- Butt joints and penetrations must be sealed per spec.
That part matters. If the product name is right but the install details are off, you can still run into warranty trouble.
Prepare home access, landscaping, and exterior items before the crew arrives
Once the paperwork and product details are set, get the house ready for day one. Clear the area around the home. Move patio furniture, grills, planters, and anything else stored against the walls.
If shrubs, garden beds, or irrigation heads sit close to the foundation, flag them before the crew arrives. Keep exterior outlets and hose bibs easy to reach.
A clear perimeter helps the crew stage materials, set work zones, and get started without guesswork.
What installation day looks like from the homeowner's perspective
Once you finish the prep checklist, the project moves from planning to short-term disruption. Your home will feel partly shut off that day. Materials, ladders, and active work areas will change how you move around the property.
Crew arrival, material staging, and work zones change how the property functions that day
Crews usually arrive early. They’ll stack materials in the driveway or along walkways, and those spots may stay partly blocked while the crew works. Parts of the exterior will become active work zones, so you won’t have normal access to those areas for a while.
After the crew sets up, you’ll likely notice one thing right away: the outside of the house can look half-done before the new panels go on.
The exterior may look unfinished before the final siding is in place
Once the old siding comes off, the crew may cover the home with a weather-resistive barrier before they install the new siding. At that stage, the house often looks unfinished because the wrap stays visible. As installers add siding section by section, the exterior can still look incomplete until they place the last pieces.
Starter strips, joint gaps, and ground clearances are visible details homeowners may notice mid-project
If you spot starter strips, open joints, or siding sitting high off the ground in the middle of the job, that usually means the crew is still working through the install. In other words: those details often show a job in progress, not a problem.
From there, the next step is the county inspection that closes the permit. The job still isn't finished until the county inspection closes the permit.
How the Hillsborough County permit and FBC inspection fit into project completion
Once the siding is up and the house looks done, one last step still matters: the county inspection. In Hillsborough County, that inspection is the final required step before permit closeout.
The permit stays open until the county inspection is closed out
The permit stays open until the county logs the inspection as passed. Until that happens, the job may look finished, but it is not officially complete.
The FBC inspection is the official checkpoint tied to the permit, not a courtesy review
The Florida Building Code inspection is the county sign-off tied to the permit. It is not an informal walkthrough or a courtesy check.
If the work passes, the permit moves toward closeout. That’s the point where the county records the job as approved under the permit.
After inspection, verify that the clearances and finished scope match the contract
Once the inspection closes, check the finished details against your contract. Look at starter strip placement, minimum ground clearance, and caulked joints.
Then confirm the full scope matches what you paid for. Save the final inspection record and closeout paperwork as proof the permit is closed. That record shows the project moved from installed to officially complete.
Why James Hardie fiber cement holds up better than vinyl siding in Tampa Bay
Once the contract confirms HZ10, the next step is picking the siding material that handles Tampa Bay weather best. That’s where the gap between vinyl and James Hardie fiber cement starts to matter.
Vinyl siding vs. James Hardie fiber cement: a side-by-side comparison for coastal Florida homes
| Category | Vinyl Siding | James Hardie Fiber Cement (HZ10) |
|---|---|---|
| Material composition | Petroleum-based plastic (PVC) | Cement, sand, and cellulose fibers |
| Product rating | Vinyl is not the HZ10-rated product required here | HZ10 is the product designation required for Tampa Bay |
| Tampa Bay climate fit | Less suited to Tampa Bay humidity, salt air, and wind-driven weather | Built for high humidity, strong UV, and coastal salt air |
Tampa Bay's climate conditions favor fiber cement over vinyl for long-term durability
Tampa Bay puts siding through a lot — heat, humidity, salt air, and wind-driven storms don't let up for long. James Hardie Fiber Cement (HZ10) is engineered for exactly those conditions: high humidity, strong UV exposure, and coastal salt air. Vinyl handles those same stressors less well, and the gap shows over time. For homeowners who want a material built for local conditions, Bayshore Exteriors installs James Hardie exclusively — fiber cement is the stronger long-term pick for Tampa Bay.
How to confirm the siding job is fully complete
Once the permit inspection passes, do one last walk-through. Your goal is simple: make sure the finished work matches the contract.
Check that board lines, trim transitions, and color finish look consistent across the exterior
Walk the full perimeter and step back often. You want the exterior to look consistent as a whole, not just up close.
Board lines should run straight across each wall. Trim around windows, doors, corners, and rooflines should fit tight, with no gaps, rough cuts, or sloppy edges. The color and finish should look even across boards, trim, edges, and openings.
If one wall looks clean but another looks off, stop there. That usually points to a missed detail, not just a style issue.
Then move to the items tied to warranty coverage.
Review warranty-related details before signing off on the finished project
James Hardie's installation specs must be followed if you want the warranty to hold up. Before you approve the job, check these visible items:
- Starter strip is installed at the base of the siding
- A clear gap sits between the bottom course and the ground, patio, driveway, or walkway
- Joints are caulked where required
These details are easy to spot during a final walk-through. They also matter for warranty coverage, so don’t treat them as small stuff.
Permit closeout and project records are the final proof the job is done
Make sure Hillsborough County has closed the permit after a passed Florida Building Code inspection. Keep the permit, passed inspection record, HZ10 paperwork, and warranty documents.
Those records are your proof the project is officially complete.
FAQs
What happens if my siding job starts without a permit?
In Hillsborough County, if you start a siding job without a permit, you skip the paper trail and the city or county inspection that checks the work against the Florida Building Code.
That gap can hurt you later. If a storm damages your home, your insurance claim may get harder because you have no official record to show the job met code.
But there's another warning sign here. If a contractor tells you to avoid permits, pay attention. In Hillsborough County, only a licensed General Contractor can pull them legally, including a CGC license holder such as CGC1536143.
How do I confirm my contractor’s CGC license is active?
Use the official Florida DBPR online lookup tool to check your contractor’s General Contractor license status. You want to see a license number in the format CGC1536143 and confirm the license is active before you sign anything.
That step tells you the contractor can legally pull the Hillsborough County building permits your siding job may need. It also shows the contractor answers to state rules and oversight.
How can I tell whether my materials are really HZ10?
Check that your materials have official Florida Product Approval or Miami-Dade NOA documents. You can also verify them in Florida’s public product approval database.
Ask your contractor for the exact product paperwork. Then make sure the crew installs everything to James Hardie’s official HZ10 specs. That helps protect your warranty and keeps the job in line with local code.
Related Blog Posts
✔ START TODAY
Personal and targeted approach

✔ FAQ
Your Questions. Our Expertise.
How do I get an accurate price for my project?
Are you licensed and insured in Florida?
How long does a typical installation take?
Does your work come with a warranty?
Why do you recommend James Hardie siding for Florida?
What specific services do you provide?
✔ START TODAY
Ready to Get Started?
Trusted and reliable Hardie board siding services backed by expert craftsmanship and high performance materials. We help homeowners achieve a durable, low maintenance exterior that looks great and stands strong for years to come.
Book an Appointment
We have received your estimate request and will be reaching out to you shortly.
.webp)